
Last Updated on December 2, 2023
Common Problems of Mechanical Keyboards – Mechanical switch keyboards are much better built compared to their membrane partners, but because of the variation of the manufacturing process, sometimes we will face some small problems that are in normal specifications, and will not affect the keyboard function.
Common Problems of Mechanical Keyboards And How to Fix Them!
| Key chattering | When a key registers multiple presses with a single keystroke. |
| The clicky switches are not clicky as what you expect | When the tactile feedback or click sound of a switch becomes weak or inconsistent. |
| Switch does not feel smooth when you click it | When a switch feels scratchy or uneven when pressed. |
| Stuck or Repeating Key on Your Mechanical Keyboard | When a key gets stuck in the pressed position or registers multiple presses without being pressed again. |
| Mechanical keyboard key sometimes not working? | When one or more keys do not register when pressed. |
| Why doesn’t my mechanical keyboard turn on? | When the keyboard does not power on or respond to input. |
| If the RGB or LED lights on your keyboard are not lighting up | When the lighting features of the keyboard do not function properly. |
| The keyboard is connected to the computer/laptop but cannot be used | When the keyboard is recognized by the computer but does not respond to input. |
| Sticky keys | When keys feel sticky or slow to return to their original position after being pressed. |
| Keys not registering | When keys do not register input or require excessive force to do so. |
| Ghosting | When multiple keys are pressed simultaneously but not all of them register. |
| Stuck keys | Stuck keys are a common problem that can occur with mechanical keyboards. This issue can happen due to several reasons, including dust or debris accumulation, misalignment of the keycap, or a malfunctioning switch. |
| Broken switches | When a switch fails to function or registers input inconsistently. |
| Missing keycaps | When a keycap falls off or is missing. |
| Loose keys | When keys feel wobbly or have excessive movement. |
| Worn out switches | When switches become less responsive or fail to register input. |
| Unresponsive keys | When keys do not register input or require excessive force to do so. |
| Inconsistent actuation force | When the force required to register a keypress varies between keys. |
| Switches that feel different | When switches of the same type feel different from each other. |
| Creaking or squeaking keys | When keys make unwanted noise when pressed. |
| Double typing | When a key registers input twice with a single press. |
| Inconsistent backlighting | When the lighting of the keyboard is uneven or flickers. |
| Software driver issues | When the keyboard software does not function correctly or is outdated. |
| Poor quality keycaps | When the keycaps are made of low-quality materials or feel flimsy. |
| Unreliable Bluetooth connectivity | When the keyboard has difficulty connecting to a device via Bluetooth. |
| Sticky stabilizers | When the stabilizers of the keyboard feel sticky or slow to return to their original position. |
| Keycaps getting stuck | When keycaps get stuck in the pressed position or do not return to their original position. |
| Accidentally hitting the wrong keys | When keys are pressed accidentally due to their placement or sensitivity. |
| Loud switches | Mechanical keyboards use individual switches for each key, and these switches can vary in terms of their sound level when pressed. Some switches are designed to be louder than others, so if you find your keyboard is too loud, you may want to consider switching to a quieter type of switch. Switches that are designed to be quieter include Cherry MX Silent and Gateron Silent switches. |
| Too much noise when typing | In addition to the sound of the switches themselves, the sound of typing on a mechanical keyboard can also be influenced by the keycaps and the material of the keyboard case. If you find your keyboard is too loud, you may want to try swapping out your keycaps for a quieter material, such as PBT or ABS, or consider adding dampening material inside the keyboard case to reduce the noise. |
| Keys that feel too stiff | The stiffness of a mechanical keyboard’s switches can vary depending on the type of switch and the force required to actuate it. If you find that your keys feel too stiff, you may want to try switching to a lighter type of switch. For example, Cherry MX Red switches require less force to actuate than Cherry MX Black switches. |
| Worn out stabilizers | Stabilizers are the mechanisms that keep larger keys, such as the spacebar and shift keys, level when pressed. Over time, stabilizers can become worn out and cause the keys to wobble or feel uneven. If you experience this issue, you may need to replace the stabilizers in your keyboard. This can be a more involved process than some of the other solutions mentioned above, so it may be best to seek assistance from a professional or experienced DIY keyboard builder. |
| Poor key rollover | When the keyboard cannot register multiple simultaneous keypresses. |
| Inconsistent key press sound | When the sound of keys varies between different keys. |
| Unresponsive media keys | When media control keys do not register input or function inconsistently. |
| Loose USB connection | When the USB cable of the keyboard is loose or disconnects easily. |
| Bent key switches | When the switches of the keyboard become bent or damaged. |
| Missing stabilizers | When stabilizers are missing from the keyboard. |
| Faulty LEDs | Faulty LEDs: when the LED lighting features of the keyboard do not function properly. |
| Too much travel distance on keys | Keys that require a lot of travel distance can feel mushy or unresponsive. |
| Inconsistent actuation point | The actuation point is the point at which a key press is registered, and inconsistency in this can make typing feel unpredictable. |
| Non-standard layout | A non-standard layout can make it difficult to find the right keys. |
| Keys that feel too light | Keys that feel too light can lead to accidental key presses. |
| Keys that feel too heavy | Keys that feel too heavy can be fatiguing to type on. |
| Unresponsive modifier keys | Modifier keys like Shift or Ctrl can become unresponsive, making it difficult to type certain characters. |
| Missing or broken springs in switches | Missing or broken springs in switches can lead to inconsistent key press behavior. |
| Sticky or gummy key switches | Sticky or gummy key switches can make typing feel unpleasant. |
| Flimsy or weak key switches | Flimsy or weak key switches can feel like they’re about to break. |
| Uneven backlighting | Uneven backlighting can make it difficult to see the keys in low light. |
| Inconsistent key spacing | Inconsistent key spacing can lead to typos. |
| Missing stabilizer inserts | Missing stabilizer inserts can cause certain keys to feel wobbly. |
| Keys that feel wobbly | Keys that feel wobbly can be distracting to type on. |
| Keys that get stuck when pressed at an angle | Keys that get stuck when pressed at an angle can make typing difficult. |
| Inconsistent tactile feedback | Inconsistent tactile feedback can make typing feel unpredictable. |
| Unresponsive or sticky function keys | Function keys can become unresponsive or sticky, making it difficult to access certain features. |
| Unresponsive or inconsistent arrow keys | Arrow keys can become unresponsive or inconsistent, making it difficult to navigate. |
| Inconsistent switch force required | Inconsistent switch force required can make typing feel unpredictable. |
| Dead or unresponsive keys | Dead or unresponsive keys can make typing difficult. |
| Keys that are difficult to press | Keys that are difficult to press can be fatiguing to type on. |
| Stuck key switches due to dirt or debris | Dirt or debris can cause key switches to become stuck. |
| Unresponsive or inconsistent volume control keys | Volume control keys can become unresponsive or inconsistent, making it difficult to adjust audio levels. |
| Keys that are too small | Keys that are too small can be difficult to hit accurately. |
| Keys that are too large | Keys that are too large can make it difficult to hit other keys. |
| Unresponsive or inconsistent macro keys | Macro keys can become unresponsive or inconsistent, making it difficult to execute custom commands. |
| Missing or broken stabilizer bars | Missing or broken stabilizer bars can cause certain keys to feel wobbly. |
| Keys that feel too shallow | Keys that feel too shallow can be uncomfortable to type on. |
| Keys that feel too deep | Keys that feel too deep can be fatiguing to type on. |
| Unresponsive or inconsistent backlighting modes | Backlighting modes can become unresponsive or inconsistent, making it difficult to customize the keyboard’s appearance. |
| Inconsistent or unresponsive RGB lighting | RGB lighting can become inconsistent or unresponsive, making it difficult to customize the keyboard’s appearance. |
| Keys that feel too hard to press | Keys that feel too hard to press can be fatiguing to type on. |
| Keys that feel too soft to press | This could be due to worn-out switches, inadequate lubrication, or incorrect installation of keycaps. |
| Inconsistent switch travel distance | This could be due to manufacturing defects, inconsistent switch weights, or incorrect installation of switches. |
| Inconsistent or unresponsive USB ports | This could be due to a faulty USB cable or connector, or a problem with the keyboard’s circuitry. |
| Keys that get stuck in the pressed position | This could be due to debris or dirt buildup, a faulty switch, or a problem with the keycap. |
| Unresponsive or inconsistent gaming mode | This could be due to a software or firmware issue, or a problem with the keyboard’s circuitry. |
| Sticky or unresponsive spacebar | This could be due to debris or dirt buildup, a faulty stabilizer, or a problem with the switch. |
| Unresponsive or inconsistent numpad keys | This could be due to a problem with the keyboard’s circuitry, faulty switches, or incorrect installation of switches. |
| Inconsistent or unresponsive scroll wheel | This could be due to a faulty encoder or a problem with the keyboard’s circuitry. |
| Sticky or unresponsive enter key | This could be due to debris or dirt buildup, a faulty stabilizer, or a problem with the switch. |
| Missing or broken stabilizer clips | This could cause keys to feel unstable or wobbly, or to get stuck in the pressed position. |
| Keys that feel too bouncy | These issues could be due to the type of switch used, the type of keycap used, or the way the keyboard is assembled. |
| Keys that feel too mushy | This could be due to a software or firmware issue, or a problem with the keyboard’s circuitry. |
| Inconsistent or unresponsive lock keys | This could be due to a software or firmware issue, or a problem with the keyboard’s circuitry. |
| Inconsistent or unresponsive function layer keys | This could be due to a software or firmware issue, or a problem with the keyboard’s circuitry. |
| Unresponsive or inconsistent media control keys | This could be due to a problem with the keyboard’s Bluetooth module or a software issue. |
| Keys that feel too slippery | These issues could be due to a software or firmware issue, or a problem with the keyboard’s circuitry. |
| Keys that feel too rough | This issue can occur due to worn-out switches, which can cause the keys to feel gritty or rough when pressed. |
| Unresponsive or inconsistent function keys | Function keys can become unresponsive or inconsistent due to faulty connections, software issues, or wear and tear. |
| Inconsistent or unresponsive Bluetooth pairing | Bluetooth pairing issues can occur due to weak signal strength, interference, outdated drivers, or software conflicts. |
| Inconsistent or unresponsive touchpad | This issue can occur due to software glitches, driver issues, or hardware problems. |
| Inconsistent or unresponsive touchpad buttons | Touchpad buttons can become inconsistent or unresponsive due to wear and tear or faulty connections. |
| Inconsistent or unresponsive palm rest | This issue can occur due to loose connections or hardware problems. |
| Inconsistent or unresponsive wrist rest | Like the palm rest, the wrist rest can also become inconsistent or unresponsive due to loose connections or hardware problems. |
| Sticky or unresponsive backspace key | Sticky or unresponsive backspace key can occur due to debris or dirt getting lodged under the keycap, worn-out switches, or faulty connections. |
| Missing or broken stabilizer inserts | The stabilizer inserts are responsible for keeping the larger keys stable, and if they are missing or broken, the keys can become wobbly or unstable. |
| Keys that feel too springy | This issue can occur due to the type of switches used in the keyboard or due to wear and tear. |
| Keys that feel too dampened | This issue can arise if the keyboard has been exposed to moisture, causing the switches to become sticky or gummy. Alternatively, it could be due to dirt or debris that has accumulated inside the switch housing, affecting the key’s travel and tactile feedback. |
| Inconsistent or unresponsive Windows key | The Windows key is an essential key on most keyboards, used for accessing the start menu and other functions in Windows. If the Windows key is not responding consistently, it could be due to a faulty switch, a damaged contact pad, or a problem with the circuitry on the keyboard’s controller. |
| Inconsistent or unresponsive Alt key | The Alt key is another important key, used for accessing keyboard shortcuts in various applications. If the Alt key is not working consistently, it could be due to a similar set of issues as the Windows key – faulty switch, damaged contact pad, or a problem with the circuitry. |
| Inconsistent or unresponsive Ctrl | The Ctrl key is perhaps the most commonly used key in keyboard shortcuts. If it is not working consistently, it could be due to the same issues as the Windows and Alt keys, or it could be due to a problem with the keyboard’s firmware or software drivers. |
Key chattering
Key chattering is a common problem that occurs when a key registers multiple times when pressed once. This can be very frustrating and make typing difficult. Fortunately, there are several ways to fix key chattering:
- Cleaning the switch: Dust and debris can build up inside the switch, causing it to malfunction. You can clean the switch by using compressed air to blow away any dust or debris. If that doesn’t work, you can also try using a small amount of isopropyl alcohol to clean the switch.
- Replace the switch: If cleaning the switch doesn’t work, you may need to replace it. You can purchase replacement switches online or from a local computer store. To replace the switch, you will need to desolder the old switch and solder in the new one.
- Adjusting the debounce time: If your keyboard has software that allows you to adjust the debounce time, you can try increasing it. Debounce time is the amount of time the keyboard waits before registering a keystroke. Increasing the debounce time can help prevent key chattering.
The clicky switches are not clicky as what you expect
If your clicky switches are not clicky as expected, there are a few things you can do to fix the problem:
- Clean the switch: Similar to key chattering, dust and debris can build up inside the switch, causing it to become less clicky. You can clean the switch by using compressed air or isopropyl alcohol.
- Replace the switch: If cleaning the switch doesn’t work, you may need to replace it. Make sure to purchase a switch that is compatible with your keyboard.
- Lubricate the switch: Sometimes switches can become stiff over time, which can cause them to become less clicky. You can try lubricating the switch with a small amount of silicone lubricant. Be sure to use a lubricant that is safe for electronics.
- Adjust the actuation point: Some keyboards allow you to adjust the actuation point of the switch. The actuation point is the distance the switch needs to be pressed before it registers a keystroke. Adjusting the actuation point can help make the switch feel more clicky.
Switch does not feel smooth when you click it
This problem is usually caused by dirt or debris getting inside the switch, which can cause friction and make the switch feel rough when you press it. To fix this problem, you can follow these steps:
- Unplug the keyboard and remove the keycap from the switch.
- Use compressed air or a small brush to clean the inside of the switch. Be gentle and make sure not to damage the switch.
- If the switch still feels rough, you may need to lubricate it. Apply a small amount of switch lubricant to the inside of the switch and then press the switch a few times to distribute the lubricant.
- Reassemble the keycap and test the switch to see if it feels smoother.
Stuck or Repeating Key on Your Mechanical Keyboard
If a key is stuck or repeating when you press it, it may be caused by a few different things. Here are some steps you can take to fix the problem:
- Unplug the keyboard and remove the keycap from the stuck key.
- Check for any debris or dirt that may be preventing the key from functioning properly. If you see anything, gently remove it.
- If the problem persists, the switch may be faulty. You can try using a keycap puller to remove the switch and then replace it with a new one.
- If the problem continues after replacing the switch, the issue may be with the keyboard’s firmware. Try updating the firmware or resetting the keyboard to its default settings.
1. Adjust the Repeating Key Rate In Your Operating System
If your keyboard keys are often typing repeatedly that causes you to type “A” into “AAAAAAA”, you can still fix it without disassembling switches, keycaps and others. Try to do the settings on the Windows operating system (If you are using Windows).
On Windows OS
- Open Control Panel
- Then double-click the Keyboard icon.
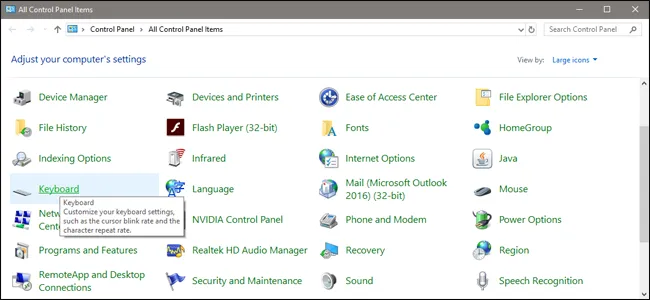
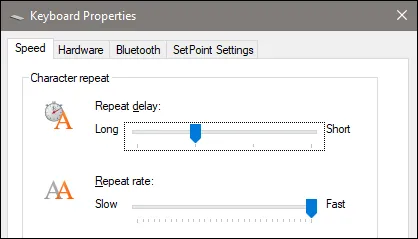
- In the Speed tab, take a look at the “Repeat delay” setting.
- So slide the setting closer to “long” to avoid a repeated key at longer intervals.
- If repeated typing on your keyboard is not too bad, this should be the best solution.
On MacOS
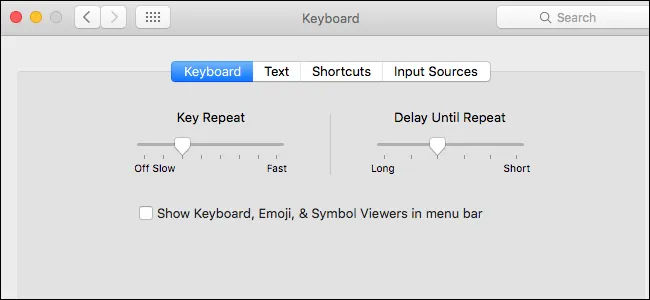
Do the same settings on MacOS (If you use one). Find the menu as shown below by pressing the “Gear” icon then select the keyboard section.
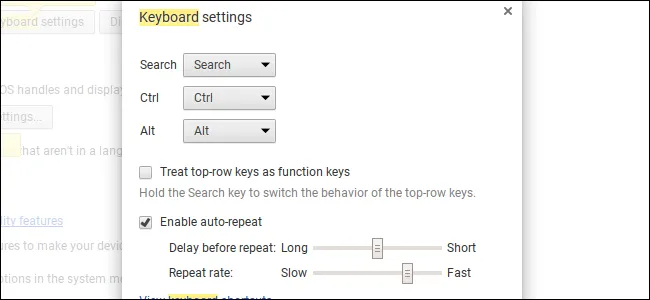
In Chrome OS:
- Settings > Device Settings > Keyboard settings.
2. Blow Out the Switch With Canned Air
Dust is usually the cause of important parts of the keyboard so that the keyboard cannot do its work optimally. The presence of a sliding or snagged spring is usually dust or similar particles. Because the up and down movement on the switch is a gap that small particles such as dust and the like can enter. This is something that mechanical keyboard owners must pay attention to, always keep your keyboard clean.
With the excuse of wasting time, many mechanical keyboard owners choose a shortcut by blowing compressed air on their keyboard to remove dust and other debris. In my opinion, this is quite effective but the results will not be optimal.
The best way is to disassemble your keyboard and clean it thoroughly, but this does require some skill and skill because if you don’t have experience it will only damage your keyboard. If you choose with compressed air it’s good enough. I recommend this compressed air tool for you to use.
To do this, remove the keysCap on the affected button, then hold the keyboard vertically, perpendicular to the ground and parallel to compressed air cans. Press the key switch with your straw or finger applicator, but not all ways: You want to hold the stem about halfway between the bottom and top position. This is so that there will be remaining space between springs and sliders and the bottom of the housing switch.
Hold the can level, straight up and down – this is to prevent liquid acceler in the workspace out. With a key switch a little depression, release it with canned air for one to two seconds. Hold the desire to keep the air run longer: If a little Gunk there isn’t immediately removed, it might not come out with more air, and you need to give time to compressed air cans to reserve back so that the acceler doesn’t come out of the can.
Set the keyboard back and apply back to the switch. Test the results on your computer. If you still have the same problem, try again or twice. If it doesn’t help, you have to use more drastic steps.
3. Disassemble the Switch (If You Can)
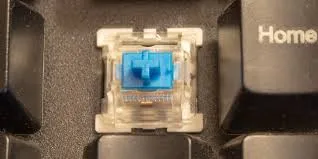
This is where everything starts difficult. Remember that each switch on your keyboard is a unit contained which is basically a small plastic box with a spring, slider, and an electrical switch in it. On a particular keyboard – which with a switch is mounted to PCB and not “plates” – it is to bring up the top off, remove the slider and spring, and clean the plastic and switch manually.
It’s hard, boring, and honest, rather tends to solve the switch and with your keyboard extension. And it might not even work on your keyboard (do some googling to see if yours are installed PCB or installed on the plate). But if you are at the end of your intelligence and the only other option is to replace your keyboard, it might need to be shot.
For this, you will need a long and thin tool to press the hook and something small and a little sharp to gouge the casing. A pair of tweezers or small needle pliers will be made for the first, and a small screwdriver or a thin bladed pocket knife must work for the last. You also need to clean inventory: air cans, tip-q, and rub alcohol.
Now you need to know whether your switch is installed on a PCB (the circuit board that actually transfers electronic signals to your computer) or a plate (plastic or metal pieces that hold the switch above the PCB on several keyboards). This is the process for the MX-style cherry switch installed on PCB:
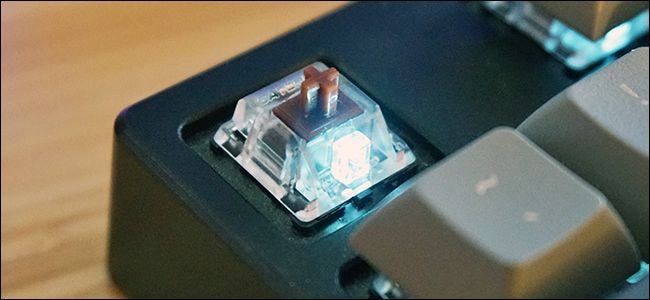
Keep in mind that the switch that does not use the standard Cherry MX construction style may be different. Topre Switch Keyboard, for example, must be quite dismantled to access one of the individual stems and spring assemblies.
Be careful after the top of the loose housing: spring pressure can encourage housing and stem and move away. Now you have to have three separate parts: the top of the housing, stem, and spring. You can see the bottom of the housing still attached to the keyboard itself. You must be able to fully clean the switch housing with canned air, tip-q, and rub alcohol. Use a light touch.
Once alcohol has evaporated, put a spring back to the housing (around the hole in the middle), then lower the stem to the spring and lower the housing to the stem. (Check another switch on your keyboard if you are not sure of the configuration.) Press firmly until the housing returns to its place. Replace the keycap and test the button on your computer.
4. If All Else Fails, Replace the Switch
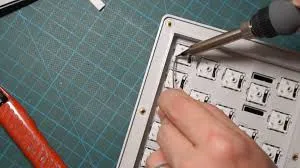
The most drastic option, if the above does not work or if you have a switch installed on the plate, it really removes the damaged switch and replaces it with a new one. To do this, you must disassemble your keyboard completely, de-solder the switch from the PCB, release it from the plate (if any), replace it with a new switch, and solder the new switch in place.
Obviously this is just an option if you know how to solder electronics, and you also have to track substitute switches, ideally from the manufacturer and the same series as your keyboard already used. This is a long and involved process that will be different for each keyboard. It’s just practical if you really like your current keyboard and don’t have funds to replace it with a new model – new soldering iron and switches will cost almost as much cheap mechanical keyboard, and it’s assuming you don’t. This disperses your keyboard further during the demolition process.
Mechanical keyboard key sometimes not working?
If a key on your mechanical keyboard is sometimes not working, it may be caused by a few different things. Here are some steps you can take to fix the problem:
- Unplug the keyboard and remove the keycap from the problematic key.
- Check for any debris or dirt that may be preventing the key from functioning properly. If you see anything, gently remove it.
- If the problem persists, the switch may be faulty. You can try using a keycap puller to remove the switch and then replace it with a new one.
- If the problem continues after replacing the switch, the issue may be with the keyboard’s firmware. Try updating the firmware or resetting the keyboard to its default settings.
Why doesn’t my mechanical keyboard turn on?
If your mechanical keyboard is not turning on, there are a few things you can try to fix the problem:
- Check that the keyboard is properly plugged in and that the USB cable is not damaged.
- Try plugging the keyboard into a different USB port or using a different USB cable.
- Check that the keyboard is compatible with your computer’s operating system.
- Try resetting the keyboard by unplugging it and holding down the ESC key for a few seconds before plugging it back in.
- If none of these steps work, there may be a problem with the keyboard’s internal components. In this case, you may need to contact the manufacturer for further assistance or consider getting a replacement.
If the RGB or LED lights on your keyboard are not lighting up
- Check the connection: Make sure your keyboard is properly connected to your computer or laptop. If you’re using a USB connection, try unplugging the keyboard and plugging it back in.
- Check the software: If your keyboard has software, check if the lighting settings are turned on. You may need to reinstall the software or update it if necessary.
- Check the lighting mode: Some keyboards have different lighting modes that may not be immediately obvious. Check your manual or online guides to see if you need to activate a specific lighting mode.
- Check the key combinations: Some keyboards have key combinations that allow you to turn the lighting on and off. Make sure you’re not accidentally turning off the lights.
- Check the LED lights: If your keyboard has LED lights, they may need to be replaced. Contact the manufacturer for replacement parts.
The keyboard is connected to the computer/laptop but cannot be used
- Check the connection: Make sure your keyboard is properly connected to your computer or laptop. If you’re using a USB connection, try unplugging the keyboard and plugging it back in.
- Check the drivers: Your keyboard may need drivers installed to function properly. Check the manufacturer’s website for the latest drivers and install them if necessary.
- Check the settings: If your keyboard is not working, it may be disabled in your computer or laptop’s settings. Check your settings to make sure your keyboard is enabled.
- Check for conflicts: If you have multiple keyboards connected to your computer or laptop, they may be conflicting with each other. Try disconnecting other keyboards and see if your mechanical keyboard works properly.
Sticky keys
- Clean the keyboard: Over time, dust, dirt, and debris can accumulate on the keys, causing them to stick. Use a can of compressed air or a keyboard cleaning kit to clean your keyboard.
- Replace the keycaps: If your keycaps are worn or damaged, they may be causing your keys to stick. Replace them with new keycaps.
- Lubricate the switches: If your switches are sticking, try lubricating them with a silicone-based lubricant. Be careful not to use too much lubricant, as it can attract dust and debris.
Keys not registering
- Check the connection: Make sure your keyboard is properly connected to your computer or laptop. If you’re using a USB connection, try unplugging the keyboard and plugging it back in.
- Clean the keyboard: Dust, dirt, and debris can accumulate on the switches, causing them to malfunction. Use a can of compressed air or a keyboard cleaning kit to clean your keyboard.
- Replace the switches: If your switches are worn or damaged, they may need to be replaced. Contact the manufacturer for replacement switches or a repair service.
Ghosting
Ghosting is a common problem with mechanical keyboards where the keyboard registers an unintended keystroke or fails to register a keystroke altogether. This can be a frustrating issue, especially for gamers who need precise and accurate input. Fortunately, there are several ways to fix ghosting on your mechanical keyboard:
- Check your keyboard’s specifications: Before trying any fixes, make sure your keyboard is not inherently prone to ghosting due to its design. Check the keyboard’s specifications or manual to see if it has a feature called “anti-ghosting” or “n-key rollover”. These features prevent ghosting by allowing the keyboard to register multiple key presses simultaneously without issue.
- Use a PS/2 connection: If your keyboard supports a PS/2 connection, try using it instead of USB. PS/2 is an older connection type but is still preferred by some gamers because it has better anti-ghosting capabilities.
- Update your keyboard’s firmware: Check your keyboard manufacturer’s website to see if there are any firmware updates available for your keyboard. These updates can fix bugs and improve performance, including reducing ghosting.
- Change your USB port: Try plugging your keyboard into a different USB port on your computer. Some USB ports may have more bandwidth than others, which can affect your keyboard’s performance.
- Disable “Filter Keys” in Windows: Windows has a feature called “Filter Keys” that can cause keyboard input delays and potentially trigger ghosting. To disable this feature, go to the Control Panel > Ease of Access Center > Make the keyboard easier to use, and uncheck the box for “Turn on Filter Keys”.
- Disable unused keys in your game: Some games may have built-in key mapping that conflicts with your keyboard’s input. Disable any unused keys in your game’s settings to prevent ghosting.
- Clean your keyboard: Dirt, debris, and moisture can interfere with your keyboard’s performance and cause ghosting. Use a can of compressed air to clean out any debris, and wipe down the keys with a soft, damp cloth.
By following these steps, you can fix ghosting on your mechanical keyboard and enjoy more accurate and precise input for gaming and typing.
Stuck keys
If you’re experiencing a stuck key, it’s usually because something is preventing the switch from moving up or down. The most common cause of a stuck key is debris that has accumulated underneath it. To fix this issue, follow these steps:
- Turn off your keyboard and unplug it from your computer.
- Gently remove the keycap from the stuck key using a keycap puller or a flat object like a butter knife.
- Use a can of compressed air or a small brush to clean any debris from the switch and the area around it.
- If the switch is still stuck, use a small amount of rubbing alcohol and a cotton swab to clean the switch’s contact points. Step 5: Reattach the keycap, plug in your keyboard, and test the key to ensure it’s working correctly.
Broken switches
If one or more switches on your mechanical keyboard have stopped working, you’ll need to replace them. Here’s how:
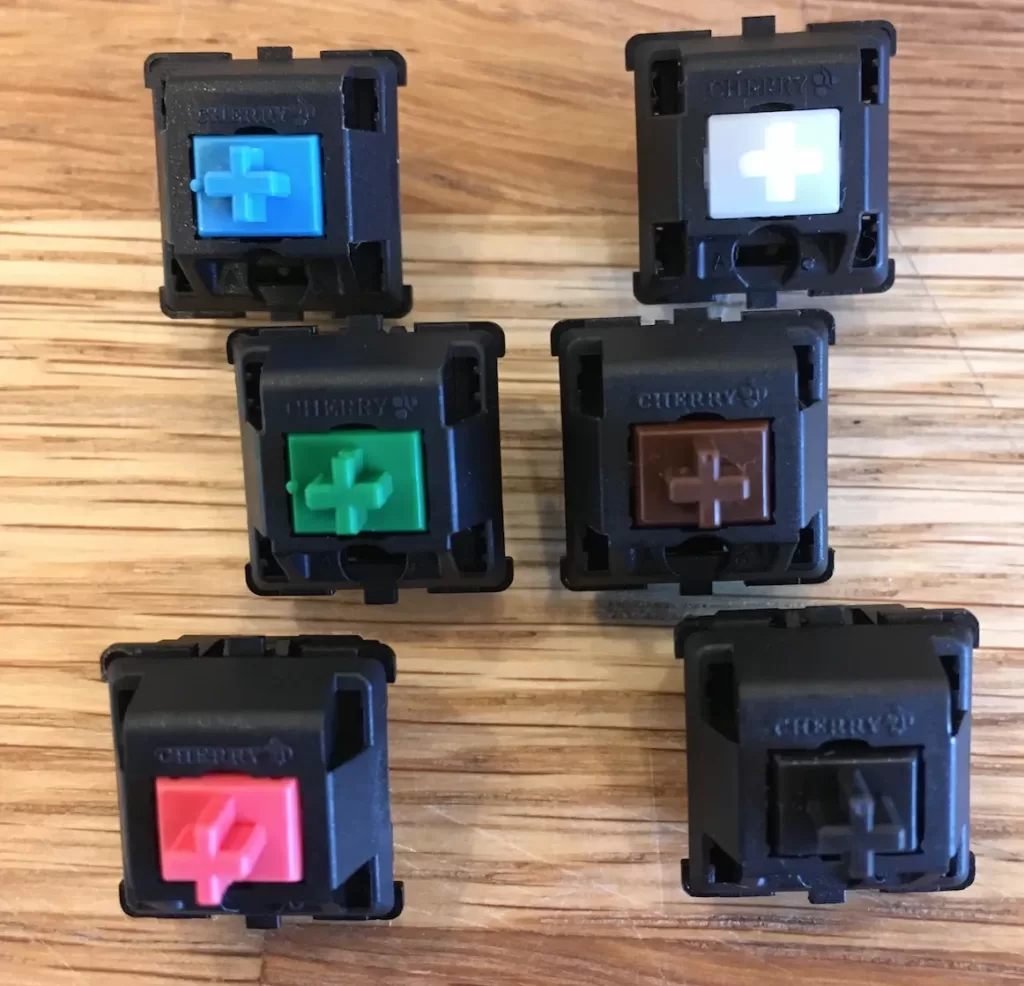
- Purchase replacement switches that match the ones on your keyboard. Cherry MX switches are the most common type of switch used in mechanical keyboards.
- Turn off your keyboard and unplug it from your computer.
- Remove the keycaps from the affected switches using a keycap puller or a flat object like a butter knife.
- Use a desoldering pump or a desoldering wick to remove the solder from the pins of the broken switch.
- Once the switch is removed, insert the replacement switch and solder it to the PCB.
- Reattach the keycaps, plug in your keyboard, and test the switches to ensure they’re working correctly.
Missing keycaps
If you’ve lost one or more keycaps from your mechanical keyboard, you can replace them by purchasing replacement keycaps. Here’s how to replace them:
- Purchase replacement keycaps that match the size and shape of the missing ones. Keycaps come in different sizes and profiles, so make sure you buy ones that are compatible with your keyboard.
- Gently press the replacement keycaps onto the switches until they snap into place.
- Test the replaced keycaps to ensure they’re working correctly.
Loose keys
If you notice that some of the keys on your mechanical keyboard feel loose or wobbly, it’s likely because the stabilizer clips are not holding them securely in place. Here’s how to fix this issue:
- Turn off your keyboard and unplug it from your computer.
- Remove the keycaps from the loose keys using a keycap puller or a flat object like a butter knife.
- Check the stabilizer clips to ensure they are properly seated and not damaged. If they are damaged, you may need to replace them.
- If the stabilizer clips are fine, use a pair of tweezers or pliers to gently bend the clips towards the center of the switch. This will provide more tension and hold the key more securely in place.
- Reattach the keycaps, plug in your keyboard, and test the keys to ensure they’re working correctly.
Worn out switches
Switches are the mechanical components that register keystrokes. Over time, switches can wear out due to repeated use, which can result in keys not registering, double-registering, or registering inconsistently. To fix this problem, you can replace the worn-out switches. Here’s how:
- Identify the faulty switch. You can use a key tester or a software program that displays keystrokes to find out which switch is causing the issue.
- Remove the keycap of the faulty switch. You can use a keycap puller or your fingers to remove the keycap.
- Desolder the faulty switch. Use a desoldering pump or desoldering braid to remove the solder from the switch’s pins.
- Replace the faulty switch. Insert the new switch into the PCB (Printed Circuit Board) and solder it to the PCB.
- Test the new switch. Use a key tester or a software program to ensure that the new switch is registering keystrokes correctly.
Unresponsive keys
Unresponsive keys are keys that don’t register keystrokes when pressed. This problem can be caused by several factors, including debris or dirt between the switch and the keycap, a faulty switch, or a broken wire. To fix this problem, follow these steps:
- Remove the keycap of the unresponsive key.
- Check for debris or dirt between the switch and the keycap. If you find any debris, use compressed air or a small brush to clean it.
- Test the switch with a key tester or a software program. If the switch is faulty, follow the steps outlined in the previous section to replace the switch.
- If the switch is not faulty, check the wire connections. If you find any broken wires, you can either replace the entire cable or repair the broken wire by soldering it.
- Test the key again to ensure that it is registering keystrokes correctly.
Inconsistent actuation force
Actuation force is the amount of force required to register a keystroke. If the actuation force is inconsistent, it can be challenging to type or play games. This problem can be caused by several factors, including worn-out switches or misaligned keycaps. To fix this problem, follow these steps:
- Remove the keycaps from the affected keys.
- Check for misaligned keycaps. If you find any misaligned keycaps, use a keycap puller or your fingers to adjust them.
- Test the switch with a key tester or a software program. If the switch is faulty, follow the steps outlined in the first section to replace the switch.
- If the switch is not faulty, check for worn-out switches. If you find any worn-out switches, follow the steps outlined in the first section to replace the switches.
- Test the keys again to ensure that they have a consistent actuation force.
Switches that feel different
If your mechanical keyboard switches start feeling different, there could be a few reasons behind it. The most common cause is dust or debris that has accumulated under the keys. To fix this issue, follow these steps:
- Turn off the keyboard and unplug it from your computer.
- Remove the affected keycaps by gently pulling them off. You can use a keycap puller or your fingers to do this.
- Use a can of compressed air to blow out any dust or debris that has accumulated under the keycap. You can also use a soft-bristled brush to remove any stubborn debris.
- If the issue persists, you may need to desolder the switch and clean it thoroughly. This is a more advanced fix and may require some technical skills.
Creaking or squeaking keys
If you hear creaking or squeaking noises when typing on your mechanical keyboard, it could be due to a few reasons. Here are some solutions:
- Lubricate the switch: Sometimes, the switches themselves can make noise when they’re not adequately lubricated. You can use a thin layer of lubricant to fix this issue. However, be careful not to over-lubricate as this can cause other problems. You can use a small brush or a q-tip to apply the lubricant to the switch.
- Tighten the stabilizers: Stabilizers are the metal bars that stabilize larger keys like the spacebar and enter key. If they’re loose, they can cause the key to creak or squeak. To fix this issue, remove the keycap and locate the stabilizer. Tighten the screws or clips that hold it in place.
- Check the keycap: Sometimes, the creaking or squeaking noise can come from the keycap itself. Remove the keycap and inspect it for any cracks or damage. If it’s damaged, replace it with a new one.
Double Typing
Double typing is a common issue that occurs when a key is registered twice instead of once, resulting in unintended keystrokes. Here are some steps to fix this problem:
- Check for Physical Damage Inspect the keyboard for physical damage such as loose keys, damaged switches, or debris stuck between keys. If you find any physical damage, you may need to replace the affected component.
- Adjust Typing Speed Adjust your typing speed to see if it solves the problem. Typing too fast or too hard may cause double typing. Try slowing down your typing speed and see if the issue persists.
- Disable Repeat Keys Double typing can also occur due to the repeat key function of the operating system. To disable this function on Windows, go to Control Panel > Keyboard > Repeat delay, and adjust the delay to Long. On Mac, go to System Preferences > Keyboard > Delay Until Repeat and adjust the delay to Long.
- Adjust Switch Debounce Time Some mechanical keyboards have a switch debounce time setting in their software that can be adjusted to fix double typing. This setting ensures that a key is only registered once when pressed. Adjust the debounce time in the keyboard’s software to see if it resolves the issue.
Inconsistent Backlighting
Inconsistent backlighting is a common problem with mechanical keyboards that have LED lighting. Here are some steps to fix this problem:
- Check for Loose Connections Inspect the keyboard’s connection to the computer and ensure that it is properly connected. A loose connection may cause inconsistent backlighting.
- Adjust Brightness Settings Adjust the brightness settings in the keyboard’s software to see if it fixes the inconsistent backlighting issue. Some keyboards have brightness settings that can be adjusted manually, while others have preset brightness levels.
- Reset Keyboard Resetting the keyboard to its default settings may also fix the inconsistent backlighting problem. To reset the keyboard, refer to the user manual for instructions on how to do so.
- Replace LED Bulbs If the above steps do not work, the LED bulbs may need to be replaced. This requires disassembling the keyboard and replacing the faulty LED bulb(s). If you are not comfortable doing this yourself, seek the assistance of a professional technician.
Software driver issues
Mechanical keyboards are often equipped with programmable keys and RGB lighting, which requires software drivers to function properly. However, sometimes the drivers may not work as intended or may conflict with other programs on your computer, causing various issues such as lag, unresponsiveness, or even crashes.
To fix software driver issues on mechanical keyboards, follow these steps:
- Check for updates: Visit the manufacturer’s website and look for the latest version of the software driver for your keyboard. Download and install it if available.
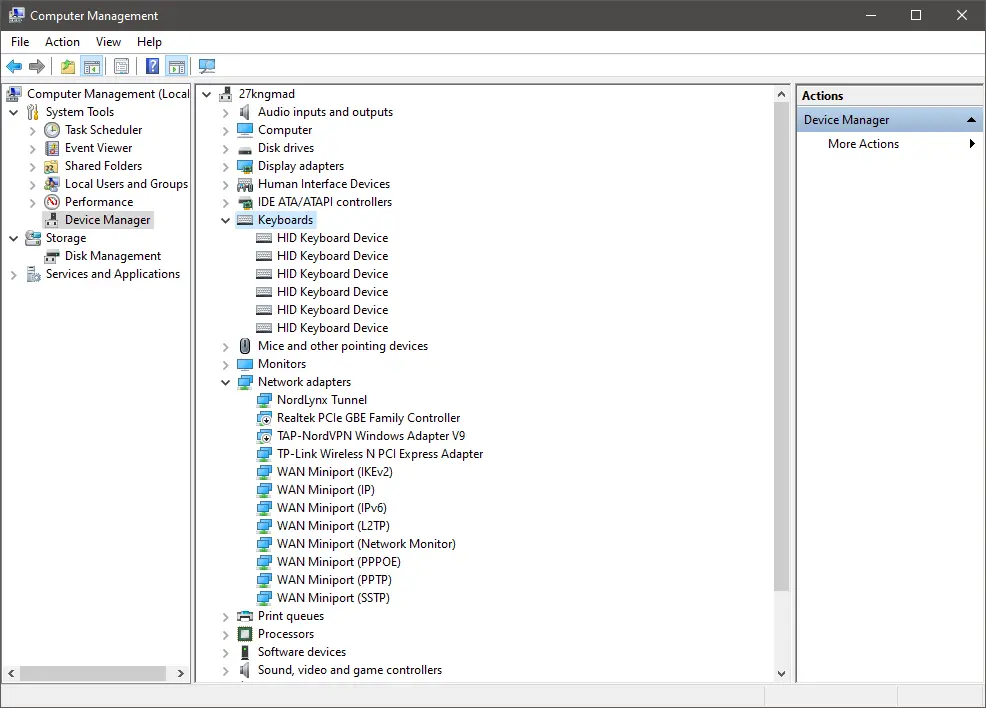
- Uninstall and reinstall the driver: Go to Device Manager on your computer and locate your keyboard. Right-click on it and select Uninstall. Then, restart your computer and let Windows automatically reinstall the driver. You can also download and install the driver from the manufacturer’s website.
- Disable conflicting programs: Some software programs like antivirus or firewall may conflict with your keyboard driver. Try disabling them temporarily and check if the issue is resolved.
- Contact manufacturer support: If the above steps do not resolve the issue, contact the manufacturer’s support team for further assistance.
Poor quality keycaps
Keycaps are the visible part of a keyboard that you interact with every day. Poor quality keycaps may wear out quickly, become discolored, or even break, affecting the overall typing experience.
To fix poor quality keycaps on mechanical keyboards, follow these steps:
- Replace the keycaps: Look for compatible replacement keycaps made from high-quality materials such as PBT or ABS plastics. They are more durable and resistant to wear and tear.
- Clean the keycaps: Regularly clean your keycaps with a soft brush or cloth and a gentle cleaning solution to prevent dirt and grime buildup that can lead to discoloration or deterioration.
- Lubricate stabilizers: Keycap stabilizers can become noisy or squeaky over time. Apply a small amount of lubricant like dielectric grease to the stabilizers to reduce friction and noise.
Unreliable Bluetooth connectivity
Some mechanical keyboards come with Bluetooth connectivity, which allows you to use them wirelessly with your devices. However, Bluetooth connectivity can be prone to interference or connectivity issues.
To fix unreliable Bluetooth connectivity on mechanical keyboards, follow these steps:
- Move closer to the device: Ensure that your keyboard is within a reasonable distance from your device, ideally within 10 meters or 30 feet, to avoid signal loss or interference.
- Remove obstacles: Remove any obstacles or interference sources like metal objects or other wireless devices that may block the Bluetooth signal.
- Pair again: Sometimes, re-pairing your keyboard with your device may resolve connectivity issues. Turn off Bluetooth on your device and keyboard, then turn them on again and try pairing them.
- Check battery level: If your keyboard runs on batteries, check if the battery level is low. Replace them if necessary.
- Update firmware: Check if the manufacturer has released any firmware updates for your keyboard that may improve Bluetooth connectivity. Download and install the update if available.
- Use a wired connection: If all else fails, consider using a wired connection instead of Bluetooth to avoid connectivity issues altogether.
Sticky stabilizers
Stabilizers are the components that keep larger keys stable and even when pressed. Over time, stabilizers can become sticky and cause keys to feel uneven or unresponsive. To fix sticky stabilizers, follow these steps:
- Remove the keycap(s) from the affected stabilizer(s) using a keycap puller or gently pry them off with a flat tool such as a credit card.
- Apply a small amount of lubricant (such as silicone grease or dielectric grease) to the stabilizer wire and/or the plastic parts that hold the wire in place. Be careful not to use too much, as excess lubricant can attract dust and dirt.
- Reattach the keycap(s) and test them for smoothness and evenness of movement. Repeat the process as necessary.
Keycaps getting stuck
Sometimes keycaps can get stuck, either because they are worn out or because of dirt and debris buildup. To fix keycaps that are getting stuck, try the following:
- Remove the affected keycap(s) using a keycap puller or gently pry them off with a flat tool such as a credit card.
- Clean the underside of the keycap(s) and the stem(s) on the keyboard using a soft-bristled brush or compressed air. Be careful not to apply too much force, as this can damage the keycap or stem.
- Inspect the keycap(s) and the stem(s) for damage or wear. If necessary, replace the affected keycap(s) or contact the manufacturer for a replacement.
- Reattach the keycap(s) and test them for smooth movement.
Accidentally hitting the wrong keys
Sometimes users may accidentally hit the wrong keys, which can be frustrating and lead to errors. To minimize accidental key presses, try the following:
- Check your typing posture and technique. Ensure that your wrists and hands are properly positioned and that you are using the correct finger placement.
- Consider using a wrist rest or ergonomic keyboard to reduce strain on your hands and fingers.
- If you frequently hit the wrong keys, consider using a keycap set with different colors or designs to help you identify keys more easily.
- If necessary, remap keys or disable keys that you frequently hit by accident using software such as AutoHotkey or the keyboard’s built-in software.
Loud switches
Mechanical keyboards can produce a loud click sound, which may be desirable for some but bothersome for others. The noise is mainly caused by the switch’s stem hitting the bottom of the keycap or the top of the switch housing. To fix this issue, you can try:
- Switching to quieter switches: Many mechanical keyboard switches are designed to produce less noise, such as Cherry MX Silent or Gateron Silent switches.
- Adding O-rings: O-rings are rubber rings that fit around the stem of the switch to dampen the sound. They are inexpensive and easy to install.
- Lubricating the switches: Adding lubricant to the switch can reduce the sound by dampening the stem’s impact. This requires disassembling the keyboard, so it’s not recommended for beginners.
Too much noise when typing
Typing on a mechanical keyboard can produce a loud noise that may be annoying to coworkers or family members. To reduce the sound, you can:
- Use a desk mat: A desk mat can absorb some of the sound produced by the keyboard.
- Switch to a quieter switch: As mentioned above, quieter switches can reduce the noise.
- Add sound-dampening foam: Placing foam underneath the keyboard or inside the case can absorb some of the sound.
- Type more softly: Typing with less force can reduce the sound produced by the keyboard.
Keys that feel too stiff
Some mechanical keyboard switches may feel too stiff, requiring too much force to press. This can cause fatigue and reduce typing speed. To fix this issue, you can:
- Switch to lighter switches: If the current switches feel too heavy, switching to a lighter switch may solve the problem. For example, Cherry MX Red switches require less force to actuate than Cherry MX Blue switches.
- Lubricate the switches: Adding lubricant to the switch can reduce friction, making it easier to press. This can also reduce noise.
- Break-in the switches: New switches may feel stiff at first, but after some use, they may become smoother and easier to press. Try using the keyboard for a few weeks to see if the switches become more comfortable.
Worn out stabilizers
Stabilizers are used in mechanical keyboards to ensure that longer keys such as the spacebar, shift, enter and backspace keys are stable when pressed, and they return to their original position after releasing. However, over time, stabilizers can become worn out, leading to an inconsistent feel when pressing the affected keys.
To fix this problem, you can try the following:
- Remove the keycap(s) of the affected key(s) and inspect the stabilizer(s) to see if they are damaged or worn out. If they are, you may need to replace them.
- If the stabilizers are not damaged, you can try lubricating them with a small amount of silicone grease. Apply a small amount of the grease to the sides of the stabilizer wire where it rubs against the plastic housing. This should help to reduce any friction and provide a smoother feel when pressing the key.
Poor key rollover
Key rollover refers to the number of keys that can be pressed simultaneously on a keyboard, without any of the keystrokes being missed. Poor key rollover can be a frustrating problem, as it can cause some keystrokes to be missed or delayed, which can affect your typing accuracy and speed.
To fix this problem, you can try the following:
- Check if your keyboard has a feature called “N-Key Rollover” (NKRO). This allows all keys to be pressed at once, without any missed keystrokes. If your keyboard does not have NKRO, try pressing fewer keys simultaneously to avoid the problem.
- If you are using a USB keyboard, try using a different USB port. Some USB ports may not be able to handle the data transfer rate required for good key rollover.
- If you are still experiencing poor key rollover, you may need to consider upgrading to a higher-quality mechanical keyboard with better rollover capabilities.
Inconsistent key press sound
One of the benefits of using a mechanical keyboard is the satisfying “click” sound that many people enjoy when typing. However, over time, the sound of the keys can become inconsistent, with some keys making a louder or quieter sound than others.
To fix this problem, you can try the following:
- Remove the keycap(s) of the affected key(s) and check for any debris or dirt that may be interfering with the switch. Use a can of compressed air or a soft-bristled brush to clean out any dust or debris.
- If cleaning doesn’t solve the problem, you may need to replace the switch for the affected key(s). This will involve opening up the keyboard and desoldering the old switch, and then soldering in a new one. This is a more advanced fix, and if you are not confident in your soldering skills, it’s best to leave this to a professional.
Unresponsive media keys
Media keys on a mechanical keyboard can stop working due to various reasons, such as incorrect software settings, outdated drivers, or hardware issues. Here are some steps to fix unresponsive media keys on a mechanical keyboard:
- Ensure that the keyboard is properly connected to your computer and that the USB cable is not loose or damaged.
- Check the keyboard settings on your computer’s operating system to ensure that the media keys are enabled and not muted.
- Install the latest drivers for your keyboard from the manufacturer’s website.
- If the above steps do not work, try resetting the keyboard’s firmware by pressing and holding down the reset button, typically located on the back of the keyboard. Alternatively, disconnect the keyboard from the computer, press and hold the Esc key, and then reconnect it to the computer. This will reset the keyboard’s firmware.
Loose USB connection
A loose USB connection can cause intermittent connectivity issues and can also damage the USB port on your computer. Here’s how to fix a loose USB connection:
- First, ensure that the USB cable is properly plugged into the keyboard and the computer.
- If the cable is damaged or worn out, replace it with a new one.
- If the USB port on the keyboard is loose, try tightening the screws on the back of the keyboard that hold the port in place.
- If the USB port on your computer is loose, try using a different USB port, or consider replacing the port altogether.
Bent key switches
Bent key switches can cause keys to stick or become unresponsive, which can affect your typing experience. Here’s how to fix bent key switches:
- First, turn off your computer and unplug the keyboard.
- Use a keycap puller to remove the keycap from the affected key switch.
- Inspect the key switch to see if it is bent or damaged. If it is, use a pair of pliers to gently straighten it out.
- If the switch is damaged beyond repair, you may need to replace it. Mechanical keyboard switches are usually sold in packs, so you may need to replace multiple switches at once.
- Once you have straightened or replaced the switch, reattach the keycap and test the key to ensure it is functioning correctly.
Missing stabilizers
Mechanical keyboard stabilizers are essential for ensuring that larger keys, such as the spacebar, function correctly. If a stabilizer is missing or broken, the key may not register when pressed, or it may feel wobbly or uneven.
To fix a missing stabilizer, you will need to replace it with a new one. Here are the steps to follow:
- Identify the missing stabilizer. Look for a small metal wire or plastic clip that connects the keycap to the switch.
- Order a replacement stabilizer. You can find them online or at your local computer hardware store.
- Remove the keycap. Use a keycap puller or your fingers to gently pull the keycap off the switch.
- Remove the old stabilizer. If the stabilizer is still attached to the keycap, gently pry it off. If it’s still attached to the switch, use a pair of pliers to remove it.
- Install the new stabilizer. Insert the new stabilizer into the keycap and align it with the switch. Make sure the stabilizer is securely in place.
- Reattach the keycap. Press the keycap firmly onto the switch until you hear a click.
Faulty LEDs
Some mechanical keyboards come with backlighting that illuminates the keys, making it easier to type in low-light conditions. If the LEDs on your keyboard are not working correctly, it could be due to a few different reasons, including a loose connection, a damaged LED, or a software issue.
Here are some steps to follow to fix faulty LEDs:
- Check the connection. Make sure the USB cable is securely connected to your computer, and the keyboard is receiving power.
- Check the LED settings. Some keyboards allow you to adjust the brightness and color of the LEDs through software. Make sure the settings are correct.
- Replace the LED. If the LED is damaged, you will need to replace it. You can find replacement LEDs online or at your local electronics store. Follow the manufacturer’s instructions to remove the old LED and install the new one.
- Replace the PCB. If none of the above steps work, the problem could be with the keyboard’s printed circuit board (PCB). You may need to replace the PCB or have it repaired by a professional.
Excessive travel distance on keys
The travel distance on a mechanical keyboard refers to the distance the key travels when pressed before registering a keystroke. If the travel distance is too long, it can make typing feel uncomfortable and slow down your typing speed.
To fix excessive travel distance on keys, you will need to adjust the actuation point. The actuation point is the point at which the key registers a keystroke. By adjusting the actuation point, you can reduce the travel distance and make typing more comfortable.
Here are the steps to follow:
- Check the manufacturer’s documentation. Some keyboards come with software that allows you to adjust the actuation point. Check the documentation to see if your keyboard supports this feature.
- Adjust the switch. If your keyboard does not have software support, you can adjust the actuation point by opening up the keyboard and adjusting the switch. This can be a complex process, so it’s best to follow the manufacturer
Inconsistent actuation point
The actuation point is the point at which the key switches register a keystroke. Inconsistent actuation point is a common problem in mechanical keyboards where the keys may not register keystrokes uniformly or consistently. To fix this issue, follow these steps:
- Cleaning the Keyboard: Turn off the keyboard and clean it thoroughly using compressed air or a brush. This will remove any dirt or debris that may be interfering with the switches.
- Check for damaged switches: Check for damaged switches on the keyboard. If you find any, replace them with new switches.
- Adjust the actuation point: Some keyboards have adjustable actuation points that can be adjusted using software. Check if your keyboard has this feature and adjust the actuation point according to your preference.
- Lubricate the switches: Lubricating the switches with silicone grease or lubricant can reduce friction and make the switches feel smoother, which can help fix the inconsistent actuation point issue.
Non-standard layout
Non-standard layout refers to keyboards that have a layout that is different from the traditional QWERTY layout. This can be a problem when trying to type quickly and accurately. To fix this issue, follow these steps:
- Use key remapping software: Key remapping software allows you to change the layout of your keyboard to your preference. This can be useful if you have a non-standard layout that is difficult to use.
- Get a new keyboard: If your current keyboard has a non-standard layout and you find it difficult to use, consider getting a new keyboard with a more traditional layout.
Keys that feel too light
Keys that feel too light can make typing feel less satisfying and make it difficult to type accurately. To fix this issue, follow these steps:
- Adjust the switches: Some keyboards have adjustable switches that can be adjusted to increase the actuation force. Check if your keyboard has this feature and adjust it accordingly.
- Replace the switches: If your keyboard does not have adjustable switches, consider replacing them with switches that have a higher actuation force.
- Add O-rings: O-rings are small rubber rings that can be added to the key switches to reduce the travel distance and make the keys feel more tactile. This can make the keys feel less light and more satisfying to type on.
Keys that feel too heavy
If your mechanical keyboard keys feel too heavy or require too much force to press down, there are a few things you can try to fix this issue:
- Check if your keyboard has a switch that allows you to adjust the actuation force. Some mechanical keyboards have switches that allow you to change the force required to press the keys. Check your keyboard’s manual or manufacturer’s website to see if this is an option.
- Clean your switches. Over time, dust and debris can build up inside the switches, making them feel heavier to press. Use a can of compressed air or a soft brush to remove any dust or debris that may have accumulated inside the switch.
- Lubricate your switches. Applying a small amount of lubricant to the switch can reduce friction and make the key feel smoother and lighter to press. Use a lubricant that is specifically designed for mechanical switches and apply a small amount to the stem of the switch.
Unresponsive modifier keys
If your modifier keys (such as shift, control, or alt) are unresponsive or require more force than usual to activate, there are a few things you can try to fix this issue:
- Check the keycap. Sometimes the keycap may be misaligned or not fully seated on the switch, which can cause the key to feel unresponsive. Remove the keycap and reposition it on the switch to see if that fixes the issue.
- Check the switch. Sometimes the switch itself may be faulty and need to be replaced. If you have spare switches, try swapping out the unresponsive switch with a working one to see if that fixes the issue.
- Clean your switches. Similar to keys feeling too heavy, sometimes debris or dust can get inside the switch and cause it to feel unresponsive. Use a can of compressed air or a soft brush to clean out any debris that may have accumulated inside the switch.
Missing or broken springs in switches
If you notice that one or more of your switches have missing or broken springs, you’ll need to replace the spring to fix the issue. Here’s how:
- Order replacement springs. You can order replacement springs online from a variety of sources. Make sure you order the correct size and type of spring for your switches.
- Remove the switch from the keyboard. Use a switch puller to remove the switch from the keyboard.
- Open the switch. Carefully open the switch using a small screwdriver or tool. Be sure to keep track of any small parts or components that may fall out.
- Replace the spring. Remove the old spring and replace it with the new one. Be sure to align the spring correctly in the switch.
- Close the switch. Carefully close the switch and reassemble any components that may have been removed.
- Reinstall the switch. Use a switch puller to reinstall the switch back into the keyboard.
Sticky or gummy key switches
If your mechanical keyboard is suffering from sticky or gummy key switches, it’s usually caused by dirt or debris buildup inside the switches. To fix this issue, you can follow these steps:
- Turn off your computer and unplug the keyboard.
- Remove the sticky keycap by gently pulling it upwards.
- Clean the switch with compressed air or a keyboard cleaning brush to remove any dirt or debris buildup.
- If the switch is still sticky, you can try using a small amount of isopropyl alcohol and a q-tip to clean the area around the switch.
- Let the switch dry for a few minutes before reattaching the keycap and testing it.
Flimsy or weak key switches
If you feel that your mechanical keyboard’s switches are becoming flimsy or weak, it may be due to worn-out springs or lubrication. To fix this problem, you can follow these steps:
- Turn off your computer and unplug the keyboard.
- Remove the keycap by gently pulling it upwards.
- Check the switch for any visible signs of wear or damage. If you notice any, you may need to replace the switch.
- If there are no visible signs of damage, try lubricating the switch with a small amount of silicone lubricant.
- If the problem persists, you can try replacing the switch’s spring with a new one.
- Reattach the keycap and test the switch.
Uneven backlighting
If your mechanical keyboard’s backlighting is uneven, it’s usually caused by a loose or damaged LED. To fix this issue, you can follow these steps:
- Turn off your computer and unplug the keyboard.
- Remove the keycap by gently pulling it upwards.
- Check the LED for any visible signs of damage or looseness. If you notice any, you may need to replace the LED.
- If the LED looks fine, try adjusting the brightness and color settings on your keyboard software.
- If the problem persists, you can try disassembling the keyboard and repositioning the LED.
- Reassemble the keyboard and test the backlighting.
Inconsistent Key Spacing
If your mechanical keyboard has inconsistent key spacing, it can be a frustrating experience to use. Fortunately, there are a few things you can try to fix this issue:
- Check the Keycaps: One common cause of inconsistent key spacing is poorly fitting or misaligned keycaps. To fix this, remove the keycaps and reposition them correctly. Make sure that they snap into place correctly.
- Check the Switches: Another possible cause of inconsistent key spacing is loose or misaligned switches. If you find any switches that are not straight, use a keycap puller to remove the keycap, then straighten the switch using a small pair of pliers or a switch opener tool.
- Adjust the Plate: If the problem persists, you may need to adjust the plate that holds the switches. Try loosening the screws that hold the plate in place, then gently pushing the plate into a more centered position. Tighten the screws back up and check to see if the spacing has improved.
Missing Stabilizer Inserts
Stabilizer inserts are small pieces of plastic that help stabilize the larger keys on your mechanical keyboard. If one or more of these inserts is missing, you may experience wobbling or inconsistent movement when you press the affected key. Here’s how to fix it:
- Check the Keycap: First, remove the keycap from the affected key and inspect the stabilizer insert. If it’s missing, you’ll need to replace it.
- Locate a Replacement: Most mechanical keyboards come with spare stabilizer inserts. If you don’t have any spares, you can purchase replacement inserts from your keyboard manufacturer or from a third-party vendor.
- c)Install the Replacement: To install the replacement insert, gently press it into the socket on the stabilizer housing. Make sure that it’s seated correctly and snaps into place.
Keys that feel wobbly
If you have keys that feel loose or wobbly when you type, it can be distracting and make it difficult to type accurately. Here are some steps you can take to fix this issue:
- Check the Keycap: The first thing to check is the keycap itself. Make sure it’s seated correctly and snapped into place. If it’s loose, remove the keycap and reposition it.
- Check the Switch: If the keycap is not the problem, the switch itself may be loose. Use a keycap puller to remove the keycap, then inspect the switch for any signs of looseness. If the switch is loose, use a small pair of pliers or a switch opener tool to straighten it.
- Check the Stabilizer: If the keycap and switch are both fine, the stabilizer may be the culprit. Check the stabilizer insert to make sure it’s seated correctly and snapped into place. If it’s loose, remove it and reinstall it.
Keys that get stuck when pressed at an angle
If a key gets stuck when pressed at an angle, it’s usually because the switch isn’t aligned properly. To fix this, try the following steps:
- Remove the keycap from the affected key by gently pulling it upwards.
- Examine the switch underneath and make sure it’s straight and properly seated in the PCB.
- If the switch is misaligned, gently push or wiggle it until it’s straight.
- Once the switch is straight, replace the keycap and test the key to make sure it’s no longer sticking.
Inconsistent tactile feedback
If you’re not getting consistent tactile feedback from your mechanical keyboard, it could be due to several factors, such as switch wear or lubrication. Here’s how you can fix this problem:
- Clean the keyboard switches: Dust and debris can accumulate inside the switches, causing them to feel inconsistent. You can use compressed air or a switch opener to clean the switches.
- Lubricate the switches: Adding a small amount of lubricant to the switch can help smooth out any inconsistencies in the tactile feedback. However, be careful not to over-lubricate, as this can cause the switch to become sluggish.
- Replace worn switches: If the switches are worn out, replacing them with new ones can help restore the keyboard’s tactile feedback.
Unresponsive or sticky function keys
If your function keys are unresponsive or sticky, it’s often due to a build-up of dirt or debris. Here’s how you can fix this problem:
- Clean the function keys: Use a soft, damp cloth or compressed air to clean the keys and remove any dirt or debris.
- Check for keycap damage: If the keycap is damaged, it may need to be replaced to restore proper function.
- Check for switch damage: If the switch itself is damaged, it may need to be replaced.
Unresponsive or Inconsistent Arrow Keys
If you’re having trouble with unresponsive or inconsistent arrow keys, there are a few things you can try:
- Clean the keys: Sometimes dirt or debris can accumulate under the keycaps, which can make them unresponsive. To fix this, remove the keycaps and clean the switches with compressed air or a brush.
- b. Check the switch: If cleaning doesn’t work, the problem may be with the switch itself. To test this, try swapping the switch with another one on your keyboard. If the problem persists, you may need to replace the switch.
- Check the connection: If neither of the above solutions work, the problem may be with the connection between the keyboard and your computer. Try disconnecting and reconnecting the keyboard, or using a different USB port.
Inconsistent Switch Force Required
If your keyboard has inconsistent switch force, it may be due to several reasons:
- Bent pins: Check the pins on your switches to see if any are bent. If they are, use a pair of tweezers to straighten them out.
- Loose switch: If a switch is loose or wobbly, it may not be making good contact with the PCB. To fix this, remove the keycap and press down on the switch until it clicks into place.
- Lubrication: If the switches are too dry or too lubricated, they may feel inconsistent. Try using a small amount of switch lubricant to make them feel smoother.
Dead or Unresponsive Keys
If you’re having trouble with dead or unresponsive keys, there are a few things you can try:
- Check the switch: If the switch is the problem, you’ll need to replace it. You can find replacement switches online or from your keyboard manufacturer.
- Check the PCB: If the problem is with the PCB, you may need to desolder the faulty switch and replace it with a new one.
- Check the connection: Make sure that the cable is properly plugged in and that the USB port is working correctly. You can also try plugging the keyboard into a different computer to see if the problem persists.
Keys that are difficult to press
If your mechanical keyboard keys are difficult to press, there could be a few reasons why:
- Key switches may be worn out: Over time, key switches can become worn out and lose their tactile feedback, making it harder to press the keys. To fix this, you may need to replace the affected key switches.
- Keycaps may be too tight: In some cases, keycaps can be too tightly secured onto the key switches, making them difficult to press. To fix this, gently remove the keycap and reattach it, making sure it’s not too tight.
- Debris or dirt in the key switches: If there’s debris or dirt in the key switches, it can hinder the key’s movement. To fix this, you can try blowing compressed air into the switch to clear out any debris. Alternatively, you can use a keycap puller to remove the keycap and clean the switch with a soft-bristled brush.
Stuck key switches due to dirt or debris
If your mechanical keyboard keys are sticking or not responding, it’s likely due to dirt or debris in the key switches. To fix this, you can try the following:
- Use compressed air: Turn off your keyboard, remove the keycap, and use compressed air to blow away any debris or dust from the affected key switch.
- Clean the key switches: For a deeper clean, you can use a soft-bristled brush to gently clean the key switch. Be careful not to apply too much pressure, as this can damage the switch.
- Lubricate the switches: If your switches are still sticking after cleaning, you can try lubricating them with a small amount of silicone grease. Apply a tiny amount of grease to the switch and move the key up and down a few times to distribute it evenly.
Unresponsive or inconsistent volume control keys
If your mechanical keyboard’s volume control keys are not working properly, it could be due to a few different reasons:
- Software issue: Make sure that the volume control keys are properly configured in your computer’s settings. If they’re not, you may need to adjust the settings to make them work.
- Connection issue: Check that the keyboard is properly connected to your computer. If the connection is loose or faulty, this could cause issues with the volume control keys.
- Dirty or worn contacts: If the contacts on the volume control keys are dirty or worn, this can cause them to be unresponsive. To fix this, you can try cleaning the contacts with a soft cloth and some rubbing alcohol. If the contacts are worn, you may need to replace the affected key switches.
Keys that are too small
If you find that the keys on your mechanical keyboard are too small, you may have a couple of options for fixing this issue:
- Replace the keycaps: One of the easiest and most effective solutions is to simply replace the keycaps with larger ones. Many mechanical keyboards come with additional keycaps that you can swap out, or you can purchase new keycaps that fit your keyboard. Make sure to check the size and spacing of your keyboard’s switches before purchasing new keycaps, to ensure a proper fit.
- Adjust your typing technique: If you’re consistently mistyping or hitting the wrong keys due to their small size, you may need to adjust your typing technique. Try using a lighter touch when typing, or adjust the positioning of your hands to better align with the keys.
Keys that are too large
If you find that the keys on your mechanical keyboard are too large, there are a few things you can try to fix this issue:
- Replace the keycaps: Similar to the solution for small keys, you can try replacing the keycaps with smaller ones. Again, make sure to check the size and spacing of your keyboard’s switches before purchasing new keycaps.
- Get a different keyboard: If you’ve tried replacing the keycaps and still find the keys too large, it may be time to consider a different keyboard. Look for one with a layout and key size that better suits your preferences.
Unresponsive or inconsistent macro keys
Macro keys are programmable keys on your keyboard that allow you to perform certain functions or execute specific commands with a single press. If your macro keys are unresponsive or inconsistent, you may need to troubleshoot the issue:
- Check the software: Make sure you have the correct software installed for your keyboard, and that it is up to date. Check the settings for your macro keys, and ensure that they are properly programmed.
- Reset the keyboard: Sometimes a simple reset can fix unresponsive macro keys. Try unplugging your keyboard, waiting a few seconds, and plugging it back in.
- Clean the keyboard: Dirt, dust, and other debris can interfere with the performance of your keyboard. Try cleaning your keyboard with compressed air or a small brush, and see if that improves the performance of your macro keys.
- Contact customer support: If none of these solutions work, you may need to contact the customer support for your keyboard manufacturer to request further assistance. They may be able to help you troubleshoot the issue or offer a replacement if necessary.
Missing or Broken Stabilizer Bars
Stabilizer bars are essential for keeping the larger keys on a mechanical keyboard stable and preventing them from wobbling or tilting. They are usually found on the spacebar, enter key, shift key, and sometimes the backspace key.
If your stabilizer bars are missing or broken, you will need to replace them. You can order new stabilizer bars from online retailers or directly from the manufacturer of your keyboard.
To replace the stabilizer bars:
- Remove the keycap from the affected key by gently pulling it up and away from the switch.
- If the stabilizer bar is missing, locate the two small holes on either side of the switch where the stabilizer bar attaches.
- Insert the new stabilizer bar into the holes on either side of the switch.
- If the stabilizer bar is broken, remove the broken pieces from the switch and insert the new stabilizer bar.
- Reattach the keycap by aligning it with the switch and pressing down firmly until it snaps into place.
Keys that feel too shallow
If the keys on your mechanical keyboard feel too shallow or do not provide enough tactile feedback, there are a few things you can do to fix the problem.
- Check the keycap: Sometimes, the keycap itself can be the problem. Check to see if the keycap is seated properly on the switch. If it is not, remove the keycap and reseat it on the switch.
- Adjust the switch height: Many mechanical keyboards have switches with adjustable heights. Check your keyboard’s manual to see if this is an option for you. If so, adjust the height of the switch until the key feels more responsive.
- Change the switch: If none of the above solutions work, you may need to replace the switch entirely. You can purchase new switches online or from the manufacturer of your keyboard. To replace the switch, follow the instructions in your keyboard’s manual or consult online tutorials.
Keys that feel too deep
If the keys on your mechanical keyboard feel too deep, meaning they require too much force to activate, you can try a few things to fix the problem.
- Adjust the switch height: Just as with keys that feel too shallow, adjusting the switch height can sometimes fix the problem of keys feeling too deep.
- Replace the switch spring: The spring inside the switch is responsible for providing the force needed to activate the key. If the spring is too weak, the key will feel too deep. You can purchase replacement switch springs online or from the manufacturer of your keyboard. To replace the spring, follow the instructions in your keyboard’s manual or consult online tutorials.
- Change the switch: If neither of the above solutions work, you may need to replace the switch entirely. You can purchase new switches online or from the manufacturer of your keyboard. To replace the switch, follow the instructions in your keyboard’s manual or consult online tutorials.
Unresponsive or inconsistent backlighting modes
If your mechanical keyboard backlighting is not working properly, it can be frustrating to use in low-light environments. Here are some things you can try to fix it:
- Check the cable: Make sure the cable connecting your keyboard to your computer is properly plugged in and not damaged.
- Check the software settings: Ensure that the backlighting is enabled in the software settings. Also, check that the lighting mode you want is selected.
- Reset the keyboard: Try resetting your keyboard to its default settings by following the manufacturer’s instructions.
- Update the firmware: If your keyboard has firmware that can be updated, make sure it’s up to date.
- Replace the keyboard: If none of the above solutions work, the issue may be with the keyboard itself, and you may need to replace it.
Inconsistent or unresponsive RGB lighting
RGB lighting is a popular feature of mechanical keyboards, but it can also cause issues. Here are some steps you can take to fix it:
- Check the cable: Ensure that the keyboard cable is properly connected and not damaged.
- Check the software settings: Check that the RGB lighting is enabled in the software settings. Also, ensure that the lighting mode you want is selected.
- Reset the keyboard: Try resetting your keyboard to its default settings by following the manufacturer’s instructions.
- Update the firmware: If your keyboard has firmware that can be updated, make sure it’s up to date.
- Check for conflicts: Sometimes, other software on your computer can interfere with your keyboard’s RGB lighting. Try closing other programs and see if that resolves the issue.
- Replace the keyboard: If none of the above solutions work, the issue may be with the keyboard itself, and you may need to replace it.
Keys that feel too hard to press
If your mechanical keyboard keys are too hard to press, it can be uncomfortable and slow down your typing speed. Here are some things you can try to fix it:
- Clean the keyboard: Over time, dust and debris can accumulate on your keyboard’s switches, making them feel harder to press. Try cleaning your keyboard with compressed air or a soft brush.
- Lubricate the switches: Some mechanical keyboard switches benefit from lubrication. Check your keyboard’s manual to see if this is an option.
- Replace the switches: If cleaning and lubricating the switches doesn’t help, you may need to replace them. You can purchase replacement switches from the manufacturer or a third-party supplier.
- Replace the keyboard: If none of the above solutions work, the issue may be with the keyboard itself, and you may need to replace it.
Keys that feel too soft to press
If the keys on your mechanical keyboard feel too soft to press, the issue may be with the keyboard’s switches. The switches may have become worn or dirty, or they may be defective. Here are some steps you can take to fix this problem:
- Clean the switches: Turn off your computer and unplug the keyboard. Use a can of compressed air to blow out any dirt or debris that may have accumulated in the switches. You can also use a small brush to gently clean the switches.
- Replace the switches: If cleaning the switches does not solve the problem, you may need to replace them. You can order replacement switches online or from a local electronics store. You will need to desolder the old switches and solder in the new ones. If you are not comfortable doing this, you can take your keyboard to a professional for repair.
Inconsistent switch travel distance
If the switches on your mechanical keyboard have inconsistent travel distance, the issue may be with the keyboard’s stabilizers. The stabilizers are the metal bars that keep the larger keys on the keyboard stable when you press them. Here are some steps you can take to fix this problem:
- Lubricate the stabilizers: Turn off your computer and unplug the keyboard. Apply a small amount of lubricant to the stabilizers to help them move more smoothly. You can use a synthetic lubricant like Super Lube or a petroleum-based lubricant like dielectric grease.
- Replace the stabilizers: If lubricating the stabilizers does not solve the problem, you may need to replace them. You can order replacement stabilizers online or from a local electronics store. You will need to desolder the old stabilizers and solder in the new ones. If you are not comfortable doing this, you can take your keyboard to a professional for repair.
Inconsistent or unresponsive USB ports
If the USB ports on your mechanical keyboard are inconsistent or unresponsive, the issue may be with the keyboard’s USB controller or cable. Here are some steps you can take to fix this problem:
- Check the cable: Make sure the cable is securely connected to the keyboard and your computer. If the cable is damaged or frayed, you may need to replace it.
- Update the drivers: Make sure you have the latest drivers for your keyboard installed. You can download them from the manufacturer’s website.
- Reset the keyboard: Turn off your computer and unplug the keyboard. Hold down the ESC key while you plug the keyboard back in. This will reset the keyboard’s USB controller.
- Replace the USB controller: If none of the above steps solve the problem, the issue may be with the keyboard’s USB controller. You may need to replace the controller or take your keyboard to a professional for repair.
Keys that get stuck in the pressed position
If one or more keys on your keyboard are getting stuck in the pressed position, there are a few things you can try to fix the issue:
- Clean the affected keys: Use a can of compressed air or a small vacuum to remove any debris that might be causing the key to stick. You can also use a small brush or a cotton swab dipped in isopropyl alcohol to clean the area around the key.
- Check the switch: If cleaning the key doesn’t fix the issue, the problem might be with the switch itself. Try swapping out the affected key with another key to see if the problem persists. If it does, the switch may need to be replaced.
- Replace the switch: If the switch is the problem, you’ll need to replace it. This can be done with a soldering iron and a replacement switch. Be sure to follow the manufacturer’s instructions carefully.
Unresponsive or inconsistent gaming mode
If your keyboard has a gaming mode that isn’t working correctly, here are some things you can try:
- Check the manual: Make sure you’re using the correct key combination to enable and disable gaming mode. Consult your keyboard’s manual for the specific key combination.
- Update firmware: Some keyboards may require a firmware update to fix issues with gaming mode. Check the manufacturer’s website for the latest firmware updates.
- Reset the keyboard: If updating the firmware doesn’t fix the issue, try resetting the keyboard to its default settings. This can usually be done by holding down a specific key combination for a few seconds.
- Contact the manufacturer: If none of these steps work, it may be a hardware issue. Contact the manufacturer for further assistance.
Sticky or unresponsive spacebar
If your spacebar is sticky or unresponsive, here are some steps you can take:
- Clean the spacebar: Like with stuck keys, you can use a can of compressed air or a small vacuum to remove any debris that might be causing the spacebar to stick. You can also use a small brush or a cotton swab dipped in isopropyl alcohol to clean the area around the spacebar.
- Check the stabilizers: The spacebar on most mechanical keyboards is stabilized with two plastic clips or metal wires. These stabilizers can become loose or damaged over time, causing the spacebar to feel sticky or unresponsive. Check the stabilizers to make sure they’re properly attached and functioning correctly.
- Lubricate the stabilizers: If the stabilizers are functioning properly but the spacebar still feels sticky, you can lubricate the stabilizers with a small amount of silicone grease. Be sure to use only a small amount, as too much grease can cause the stabilizers to become too slippery.
- Replace the stabilizers: If the stabilizers are damaged or worn out, you’ll need to replace them. This can be done with a replacement stabilizer kit.
Unresponsive or inconsistent numpad keys
- First, check to make sure that the numpad keys are not physically stuck or obstructed in any way. Sometimes, dust or debris can get trapped underneath the keys and prevent them from working properly. Use a can of compressed air or a small brush to clean out the area underneath the keys.
- If the keys are still not working, try unplugging your keyboard and plugging it back in. This can sometimes reset the connection and fix the issue.
- If the problem persists, you may need to replace the key switches. You can order replacement switches online and use a soldering iron to swap them out. However, this is a more advanced fix and should only be attempted by those with experience in soldering and electronics.
Inconsistent or unresponsive scroll wheel
- First, try cleaning the scroll wheel. Again, dust and debris can build up over time and prevent the wheel from working properly. Use a small brush or a can of compressed air to clean the area around the wheel.
- If that doesn’t work, try unplugging your keyboard and plugging it back in. This can sometimes reset the connection and fix the issue.
- If the problem persists, you may need to replace the scroll wheel. This is also a more advanced fix and requires some disassembly of the keyboard. You can order replacement wheels online and follow a guide to swap it out.
Sticky or unresponsive enter key
- First, check to make sure that the key is not physically stuck or obstructed. Sometimes, dust or debris can get trapped underneath the key and prevent it from working properly. Use a can of compressed air or a small brush to clean out the area underneath the key.
- If the key is still sticky or unresponsive, you may need to remove the keycap and clean it more thoroughly. Use a small amount of rubbing alcohol and a cotton swab to clean the keycap and the switch underneath.
- If the problem persists, you may need to replace the key switch. You can order replacement switches online and use a soldering iron to swap them out.
Missing or broken stabilizer clips
Stabilizer clips are the metal or plastic pieces that attach to the keycap and keep it stable when you press it. If a stabilizer clip is missing or broken, you may notice that the key wobbles or feels loose when you type. Here are some steps you can take to fix this issue:
- First, identify which stabilizer clip is missing or broken. You can do this by looking at the underside of the keycap and checking for any visible damage or missing pieces.
- If the stabilizer clip is simply loose, you may be able to reattach it by carefully pushing it back into place. Use a pair of tweezers or a small tool to do this.
- If the stabilizer clip is broken, you will need to replace it. You can purchase replacement stabilizer clips online or from a computer hardware store. To replace the clip, remove the keycap from the keyboard, snap the new clip into place, and reattach the keycap.
Keys that feel too bouncy
If your keys feel too bouncy or have too much “give” when you type, it may be because the spring inside the switch is too weak or because the switch itself is not properly lubricated. Here are some solutions you can try:
- If the spring inside the switch is too weak, you may need to replace the switch with a stronger one. This will involve opening up your keyboard and desoldering the old switch, so it’s not a quick fix. However, it can make a big difference in the feel of your keys.
- If the switch itself is not properly lubricated, you can add some lubricant to it. This will reduce friction and make the key feel smoother. You can use a specialized keyboard lubricant or a light machine oil for this. Be sure to apply the lubricant sparingly and evenly, as too much can cause the key to stick.
Keys that feel too mushy
If your keys feel too mushy or don’t have enough tactile feedback when you type, it may be because the switch is too heavily lubricated or because the keycap is too thick. Here are some solutions you can try:
- If the switch is too heavily lubricated, you can try removing some of the lubricant. This can be done by opening up the keyboard and wiping away excess lubricant with a clean, dry cloth. Be sure to wipe away all the excess, as leaving some behind can cause the key to stick.
- If the keycap is too thick, you can try replacing it with a thinner one. Thinner keycaps will allow more of the tactile feedback from the switch to come through, which can make the key feel less mushy. You can purchase replacement keycaps online or from a computer hardware store.
Inconsistent or unresponsive lock keys
Lock keys on mechanical keyboards, such as Caps Lock, Num Lock, and Scroll Lock, can sometimes become inconsistent or unresponsive. If this happens, try the following solutions:
- Check for debris: Over time, dust and debris can accumulate under the keycap and prevent the key switch from functioning correctly. Remove the keycap and clean the switch with compressed air or a soft-bristled brush.
- Check for damage: Inspect the keycap and switch for any signs of physical damage, such as cracks or bent pins. If you find any damage, you may need to replace the keycap or switch.
- Update keyboard firmware: Check if there is a firmware update available for your keyboard. Firmware updates can fix bugs and improve keyboard performance.
Inconsistent or unresponsive function layer keys
Function layer keys, also known as programmable keys, can be customized to perform specific functions or macros. If these keys are inconsistent or unresponsive, try the following solutions:
- Check keyboard software: Most mechanical keyboards come with software that allows you to customize the function layer keys. Check the software to make sure the keys are programmed correctly and that the firmware is up to date.
- Reset the keyboard: Some keyboards have a reset function that restores the default settings. Refer to the keyboard manual for instructions on how to perform a reset.
- Test the key switch: If the function layer key is still unresponsive, try swapping it with a different key switch to see if the problem persists. If it does, the key switch may be defective and need to be replaced.
Unresponsive or inconsistent media control keys
Media control keys, such as volume and playback controls, can sometimes be unresponsive or inconsistent. If this happens, try the following solutions:
- Check for software conflicts: Some software, such as media players or browser extensions, may interfere with media control key functions. Try closing these programs and testing the keys again.
- Check keyboard settings: Some keyboards have media control settings that can be customized through the software. Make sure the media control keys are assigned to the correct functions.
- Update keyboard firmware: As with lock keys, firmware updates can fix bugs and improve keyboard performance.
Keys that feel too slippery
Slippery keys can be caused by various factors, such as oil buildup, dirt, or worn-out keycaps. To fix this problem, follow these steps:
- Start by unplugging the keyboard and removing the keycaps with a keycap puller or gently pry them off with a flat tool, like a credit card or a plastic spudger.
- Clean the keycaps with a soft cloth or a brush dipped in warm soapy water. Avoid using harsh chemicals or abrasive cleaners that can damage the plastic or the key legends.
- Wipe down the switches and the keyboard base with a damp cloth to remove any dirt or dust. You can also use compressed air or a vacuum cleaner to blow out any debris from the crevices.
- Dry the keycaps and the keyboard thoroughly before reassembling them. You can also use a hairdryer or a fan to speed up the drying process.
- If the keycaps are still too slippery, consider replacing them with new ones that have a different texture or coating, such as PBT, ABS, or rubber.
Keys that feel too rough
Rough keys can be caused by several factors, such as switch wear, dust, or debris. To fix this problem, follow these steps:
- Unplug the keyboard and remove the keycaps as described above.
- Check the switches for any signs of wear or damage, such as bent pins, broken stems, or loose springs. Replace any faulty switches with new ones that match the brand and model of the keyboard. You can also consider upgrading to different switches that have a smoother or more tactile feel.
- Clean the switches and the keyboard base with a brush or a cotton swab dipped in isopropyl alcohol. Avoid using water or other liquids that can damage the electronics.
- Dry the switches and the keyboard thoroughly before reassembling them.
- If the switches are still too rough, consider lubricating them with a specialized switch lube that can reduce friction and noise. Be sure to use a compatible and safe lube that won’t damage the switches or attract dust.
Unresponsive or inconsistent function keys
Function keys can become unresponsive or inconsistent due to various reasons, such as software issues, loose connections, or hardware failure. To fix this problem, follow these steps:
- Check the keyboard settings and the operating system settings to ensure that the function keys are enabled and mapped correctly. You can also try resetting the keyboard firmware or updating it to the latest version.
- Check the USB cable and the USB port for any damage, debris, or loose connections. Try using a different cable or port to see if the issue persists.
- Check the function key switches for any wear or damage. Replace any faulty switches or clean them as described above.
- If the issue still persists, consider opening up the keyboard and checking the PCB (printed circuit board) for any signs of damage or corrosion. Repair any damaged traces or components if possible, or replace the entire PCB if necessary.
Inconsistent or unresponsive Bluetooth pairing
- First, make sure that your keyboard is turned on and in Bluetooth pairing mode. Check the user manual for instructions on how to do this.
- If your keyboard is turned on and in pairing mode, but your device still can’t find it, try resetting your keyboard’s Bluetooth connection. To do this, turn off your keyboard, wait a few seconds, and then turn it back on.
- If resetting your keyboard’s Bluetooth connection doesn’t work, try resetting your device’s Bluetooth connection. Turn off Bluetooth on your device, wait a few seconds, and then turn it back on.
- If none of these steps work, try deleting the pairing information for your keyboard from your device, and then try pairing it again from scratch.
Inconsistent or unresponsive touchpad
- Check to make sure that your touchpad isn’t dirty or covered in dust. If it is, use a soft cloth to gently clean it.
- Make sure that your touchpad drivers are up to date. You can check this in your device manager.
- If your touchpad is still inconsistent or unresponsive, try disabling and re-enabling it in your device manager.
- If none of these steps work, you may need to replace your touchpad.
Inconsistent or unresponsive touchpad buttons
- Check to make sure that your touchpad buttons aren’t dirty or covered in dust. If they are, use a soft cloth to gently clean them.
- Make sure that your touchpad button drivers are up to date. You can check this in your device manager.
- If your touchpad buttons are still inconsistent or unresponsive, try disabling and re-enabling them in your device manager.
- If none of these steps work, you may need to replace your touchpad buttons.
Inconsistent or unresponsive palm rest
The palm rest of a mechanical keyboard can become inconsistent or unresponsive due to the accumulation of dust, dirt, or other debris. To fix this issue, follow these steps:
- Turn off the keyboard and unplug it from your computer.
- Remove the palm rest from the keyboard and use a soft-bristled brush to clean any debris that has accumulated on the surface of the rest.
- Use a can of compressed air to blow out any debris that may be stuck in the crevices of the palm rest.
- If the palm rest is still inconsistent or unresponsive, try reseating it firmly back into its slot on the keyboard.
Inconsistent or unresponsive wrist rest
The wrist rest of a mechanical keyboard can become inconsistent or unresponsive due to the same reasons as the palm rest. To fix this issue, follow these steps:
- Turn off the keyboard and unplug it from your computer.
- Remove the wrist rest from the keyboard and use a soft-bristled brush to clean any debris that has accumulated on the surface of the rest.
- Use a can of compressed air to blow out any debris that may be stuck in the crevices of the wrist rest.
- If the wrist rest is still inconsistent or unresponsive, try reseating it firmly back into its slot on the keyboard.
Sticky or unresponsive backspace key
The backspace key of a mechanical keyboard can become sticky or unresponsive due to debris that has accumulated around the key or due to a switch that has become stuck. To fix this issue, follow these steps:
- Turn off the keyboard and unplug it from your computer.
- Use a keycap puller or your fingers to remove the keycap from the backspace key.
- Use a soft-bristled brush to clean any debris that has accumulated around the switch or keycap.
- Use a can of compressed air to blow out any debris that may be stuck in the crevices of the switch or keycap.
- If the switch is still sticky or unresponsive, you may need to remove it from the keyboard and clean it more thoroughly or replace it entirely. Consult your keyboard’s manual or a professional if you are unsure how to do this.
Missing or broken stabilizer inserts
Stabilizer inserts are used in mechanical keyboards to prevent the larger keys from wobbling and to ensure smooth key travel. If you find that your keyboard is missing some stabilizer inserts or that they are broken, here’s how you can fix it:
- Check for Missing or Broken Inserts First, identify the missing or broken inserts. These are usually located on larger keys such as the spacebar, shift, or enter keys.
- Remove the Keycap Carefully remove the keycap from the key switch by gently pulling it up. For larger keys, you may need to use a keycap puller.
- Check the Stabilizer Insert Check the stabilizer insert on the keycap and the one on the keyboard. Make sure they are both intact and not broken.
- Replace or Fix the Insert If the insert is missing or broken, you can either replace it or fix it. Replacement inserts are available from keyboard manufacturers or online. To fix a broken insert, you can try gluing it back together using a strong adhesive such as superglue.
- Reassemble the Keyboard Once you have replaced or fixed the stabilizer inserts, reassemble the keyboard by carefully snapping the keycap back onto the key switch.
Keys that feel too springy
If your keyboard keys feel too springy or bouncy, it could be due to a few reasons:
- Check for Loose Switches Check if any of the key switches are loose. If they are, they can cause the key to feel too springy. Tighten the screws that hold the switch to the keyboard.
- Check the Keycaps Check the keycaps to see if they are sitting properly on the switches. If they are not, they can cause the key to feel too springy. Remove the keycaps and reposition them properly.
- Lubricate the Switches Lubricating the switches can help reduce the springiness of the keys. Use a thin lubricant such as Krytox to lubricate the stems of the switches.
- Replace the Switches If the above steps do not help, you may need to replace the switches. Purchase replacement switches from your keyboard manufacturer or online.
Keys that feel too dampened
If your keyboard keys feel too dampened or mushy, it could be due to a few reasons:
- Check for Dirt and Debris Check if there is any dirt or debris inside the switch. Dirt and debris can cause the key to feel too dampened. Use compressed air to blow out any debris.
- Check the Keycaps Check the keycaps to see if they are sitting properly on the switches. If they are not, they can cause the key to feel too dampened. Remove the keycaps and reposition them properly.
- Replace or Clean the Switches If the switches are dirty, you can try cleaning them with a contact cleaner such as DeoxIT. If the switches are beyond cleaning, you may need to replace them.
- Change the Keycap Material The keycap material can also affect how the key feels. Some materials, such as ABS plastic, can feel more dampened than others. Consider changing to a different material such as PBT plastic.
Inconsistent or unresponsive Windows key
The Windows key is an essential key on a keyboard used to open the start menu and access various functions in Windows operating systems. If your mechanical keyboard’s Windows key is not working correctly or is inconsistent, here are some solutions:
- Check if the Windows key is physically damaged or stuck. If you find any visible damage or debris under the keycap, gently clean it with a small brush or compressed air can.
- Check if the Windows key is enabled in your computer’s settings. Go to Settings > Devices > Keyboard and turn on the “Use the Windows key” option.
- Try resetting your keyboard’s firmware by pressing the reset button or following the manufacturer’s instructions.
- If the above solutions don’t work, you can try using a key remapping software to reassign the Windows key function to another key on your keyboard.
Inconsistent or unresponsive Alt key
The Alt key is another essential key on a keyboard that is used for various shortcuts and commands in Windows applications. If your mechanical keyboard’s Alt key is not working correctly or is inconsistent, here are some solutions:
- Check if the Alt key is physically damaged or stuck. If you find any visible damage or debris under the keycap, gently clean it with a small brush or compressed air can.
- Check if the Alt key is enabled in your computer’s settings. Go to Settings > Devices > Keyboard and turn on the “Use the Alt key” option.
- Try resetting your keyboard’s firmware by pressing the reset button or following the manufacturer’s instructions.
- If the above solutions don’t work, you can try using a key remapping software to reassign the Alt key function to another key on your keyboard.
Inconsistent or unresponsive Ctrl
The Ctrl key is used for various shortcuts and commands in Windows applications, and if it is not working correctly or is inconsistent, here are some solutions:
- Check if the Ctrl key is physically damaged or stuck. If you find any visible damage or debris under the keycap, gently clean it with a small brush or compressed air can.
- Check if the Ctrl key is enabled in your computer’s settings. Go to Settings > Devices > Keyboard and turn on the “Use the Ctrl key” option.
- Try resetting your keyboard’s firmware by pressing the reset button or following the manufacturer’s instructions.
- If the above solutions don’t work, you can try using a key remapping software to reassign the Ctrl key function to another key on your keyboard.
Conclusion
In conclusion, mechanical keyboards are prone to a wide range of problems that can affect their performance and user experience. From key chattering to stuck or repeating keys, unresponsive media keys to faulty LEDs, there are many issues that can crop up with these popular peripherals. Additionally, problems with switches, keycaps, stabilizers, and connectivity can also impact the functionality and durability of mechanical keyboards.
While some issues can be resolved with simple fixes, others may require more extensive troubleshooting or even replacement of components. Regular maintenance, cleaning, and inspection can help prevent or address common problems before they become more serious.
Ultimately, it’s important to carefully consider your needs and preferences when selecting a mechanical keyboard and to choose a reputable brand that offers quality components and reliable support. By taking the time to research and invest in a high-quality mechanical keyboard, you can enjoy a comfortable and reliable typing experience for years to come.
FAQs
What is a mechanical keyboard?
A mechanical keyboard is a type of computer keyboard that uses individual mechanical switches for each key, as opposed to the rubber dome switches used in most traditional keyboards. The mechanical switches provide tactile feedback and a distinctive clicking sound when pressed, which many users find more satisfying and precise than the mushy feel of rubber dome keyboards. Mechanical keyboards are often favored by gamers, programmers, and other heavy keyboard users who prioritize durability, accuracy, and customizability.
What are the benefits of using a mechanical keyboard?
Mechanical keyboards offer several benefits over traditional membrane keyboards, including:
- Improved durability: Mechanical keyboards are built to last, with high-quality switches that can withstand millions of keystrokes. This means they are less likely to break or wear out over time, making them a more reliable option.
- Better typing experience: Mechanical keyboards provide a tactile feedback and distinct click sound with each key press, which can improve typing accuracy and speed.
- Customizability: Many mechanical keyboards allow for customization of key switches, keycaps, and backlighting, giving users greater control over the look and feel of their keyboard.
- Ergonomic design: Some mechanical keyboards feature ergonomic designs that can reduce strain on the hands and wrists, making them a more comfortable option for extended typing sessions.
Overall, mechanical keyboards are a durable, customizable, and ergonomic option that can provide a more enjoyable and efficient typing experience.
What are some common problems with mechanical keyboards?
Some common problems with mechanical keyboards include key chatter (multiple characters registering for a single keystroke), key switch failure, keycap fading or wear, and noise (mechanical keyboards can be louder than membrane keyboards).
Why are my mechanical keyboard keys sticking?
Your mechanical keyboard keys may be sticking due to a few reasons such as dirt or debris buildup, insufficient lubrication, damaged or worn out keycaps, or issues with the switches themselves.
How can I fix a key that is not registering when I press it?
There are a few potential solutions to fix a key that is not registering when pressed, including checking for any physical obstructions or damage, trying a different keyboard or port, updating keyboard drivers or software, and cleaning the keyboard.
Why do my mechanical keyboard keys make a loud noise?
Mechanical keyboard keys make a loud noise because they use physical switches that generate a distinct sound when pressed. The sound is created by the switch mechanism itself, which usually involves a metal spring or switch stem hitting against a plastic housing. Additionally, the keycaps on mechanical keyboards are often made of thicker and more durable materials, which can also contribute to the sound when the keys are pressed.
How can I make my mechanical keyboard quieter?
There are several ways to make a mechanical keyboard quieter, including using dampeners or o-rings, lubricating switches, using silent switches, and using a keyboard case or mat to absorb sound.
What should I do if my mechanical keyboard is not responding at all?
If your mechanical keyboard is not responding at all, you should first check if it is properly connected to your computer. If it is, try restarting your computer and testing the keyboard again. If it still doesn’t work, try plugging it into a different USB port or using a different cable. If none of these solutions work, there may be a hardware issue with your keyboard and you may need to contact the manufacturer for further assistance.
Can I clean my mechanical keyboard and how?
Yes, you can clean your mechanical keyboard. Here’s how:
- Turn off your keyboard and unplug it from your computer.
- Remove any keycaps that are easy to remove with a keycap puller or a small tool like a flathead screwdriver. Be gentle when removing keycaps to avoid damaging them.
- Use compressed air or a soft-bristled brush to remove any loose dirt, dust, or debris from the keyboard surface and keycaps.
- If there are any stubborn stains or marks on the keycaps, you can use a mild cleaning solution such as isopropyl alcohol (rubbing alcohol) or a mixture of water and dish soap. Apply the solution to a microfiber cloth and gently rub the keycaps. Be sure to dry them thoroughly afterwards.
- For the keyboard surface, you can use a damp cloth or cleaning wipes to wipe down the surface. Again, make sure to dry it thoroughly afterwards.
- Once you’ve finished cleaning, replace the keycaps and plug the keyboard back in.
Note: It’s important to be gentle when cleaning your mechanical keyboard to avoid damaging any of the components. Additionally, be careful not to get any liquids inside the keyboard, as this could damage the electrical components.
Should I buy a mechanical keyboard with Cherry MX switches or another brand?
There are many good mechanical keyboard brands and switch types to choose from, each with their own unique characteristics. Ultimately, the decision depends on your personal preferences, typing style, and budget. It’s a good idea to try out different types of switches before making a purchase to determine which one feels the most comfortable and suits your needs.
References:
How to Fix a Stuck or Repeating Key on Your Mechanical Keyboard
How to Fix Sticky Keys on Mechanical Keyboard?
Kizaru is a fan, collector, and has a huge addiction to mechanical keyboards. Kizaru has a collection of dozens of mechanical keyboards that come in different sizes and use different switches. He also frequently contributes to various forums that discuss keyboards such as Reddit and GeekHack.
