
Last Updated on December 4, 2023
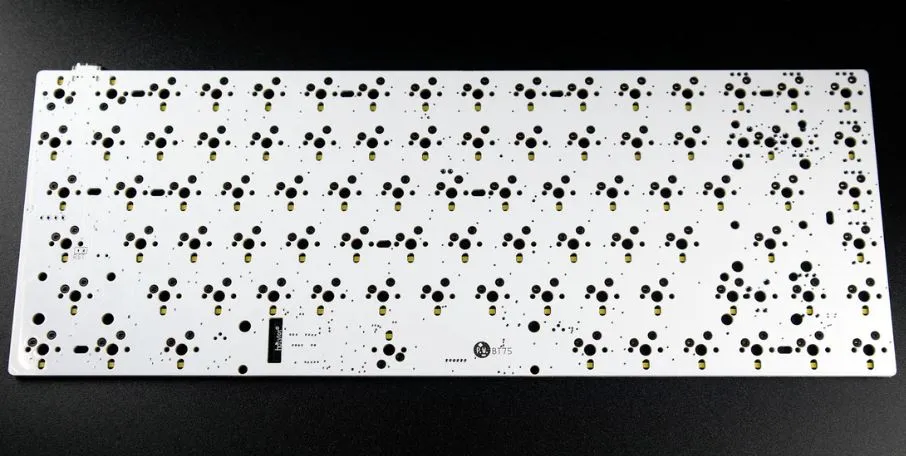
When it comes to mechanical keyboards, the Printed Circuit Board (PCB) is the backbone that holds everything together. It’s responsible for connecting the switches to the microcontroller, and in turn, translates the keystrokes into commands. Unfortunately, PCB problems are quite common in mechanical keyboards, and they can lead to a frustrating typing experience. In this article, we’ll explore some of the most common mechanical keyboard PCB problems that enthusiasts face, and how to troubleshoot them.
The Importance of PCBs in Mechanical Keyboards
Printed Circuit Boards (PCBs) play a crucial role in mechanical keyboards, and their importance lies in their ability to facilitate the communication between the keyboard’s keys and the computer.
In a mechanical keyboard, each key has its own switch, and when a key is pressed, the switch sends an electrical signal to the computer. PCBs are responsible for routing these signals from the switches to the computer’s input/output interface.
Without a PCB, the wires connecting each switch to the computer would have to be individually soldered, making the process time-consuming and error-prone. PCBs streamline the process and make it much easier to manufacture and assemble mechanical keyboards.
Additionally, PCBs also allow for more complex features to be added to mechanical keyboards, such as programmable macros and lighting effects. By incorporating these features into the PCB, users can easily customize their keyboards to their liking without having to perform complicated modifications.
Overall, PCBs are an essential component of mechanical keyboards that enable them to function reliably and efficiently, while also providing a platform for customization and innovation.
Common Mechanical Keyboard PCB Problems
| PCB Problem | Description |
|---|---|
| Key Chatter | Repeated or double keystrokes even when key is pressed once |
| Non-Functioning Keys | Keys not responding when pressed |
| Key Sticking | Key remains pressed after release or feels sticky |
| Phantom Keypresses | Random key input even when no key is being pressed |
| Ghosting | Inability to register certain key combinations simultaneously |
| Dead PCB | No response from any key on the keyboard |
| LED/RGB Issues | Malfunctioning or non-responsive lighting effects |
| PCB Damage | Physical damage to the printed circuit board |
Key Chatter
A mechanical keyboard is a type of computer keyboard that uses mechanical switches instead of rubber dome switches. Mechanical keyboards are preferred by many users because they provide a more tactile and responsive typing experience. The Printed Circuit Board (PCB) in a mechanical keyboard is responsible for translating key presses into electronic signals that are sent to the computer.
Key chatter is a problem that can occur in mechanical keyboards where a single key press results in multiple signals being sent to the computer. This can cause the computer to register multiple keystrokes for a single key press, which can be very frustrating for the user.
There are a few possible causes of key chatter in a mechanical keyboard. One common cause is a dirty or worn-out switch. Over time, dust and debris can build up inside the switch and cause it to malfunction. In this case, the switch may need to be cleaned or replaced.
Another possible cause of key chatter is a misaligned or damaged stabilizer. Stabilizers are the parts of the keyboard that keep the larger keys, such as the space bar and shift keys, stable and prevent them from wobbling or sticking. If a stabilizer is misaligned or damaged, it can cause the key to register multiple signals when pressed.
To fix key chatter in a mechanical keyboard, the first step is to determine the cause of the problem. If the problem is caused by a dirty or worn-out switch, the switch can be cleaned using a soft-bristled brush and some isopropyl alcohol. If the switch is worn out or damaged, it may need to be replaced. Replacement switches can usually be purchased online or from a local computer parts store.
If the problem is caused by a misaligned or damaged stabilizer, the stabilizer may need to be adjusted or replaced. Adjusting the stabilizer involves loosening the screws that hold it in place and repositioning it until it is properly aligned. If the stabilizer is damaged, it may need to be replaced with a new one. Replacement stabilizers can usually be purchased online or from a local computer parts store.
In some cases, key chatter may be caused by a software issue rather than a hardware issue. If this is the case, updating or reinstalling the keyboard drivers may help to resolve the issue.
In summary, key chatter in a mechanical keyboard can be caused by a variety of issues, including dirty or worn-out switches and misaligned or damaged stabilizers. To fix the issue, it is important to identify the root cause and take the appropriate steps to clean, repair, or replace the affected components.
Non-Functioning Keys
Mechanical keyboards are known for their durability, longevity, and tactile feedback. However, like all devices, they are not immune to issues such as non-functioning keys. Non-functioning keys can be frustrating, especially if they are frequently used keys. In this article, we will discuss the possible causes of non-functioning keys on a mechanical keyboard and how to fix them.
Possible Causes of Non-Functioning Keys on a Mechanical Keyboard
- Loose Switches: Mechanical keyboards use individual switches for each key. If the switch becomes loose or detached from the PCB, it can cause the key to stop working. This can happen due to rough handling or accidental damage to the keyboard.
- Dust and Dirt: Over time, dust and dirt can accumulate between the switches, causing them to stop working. This is a common problem, especially if the keyboard is used in a dusty environment.
- Stuck Switches: Sometimes, the switch can become stuck in the down position, causing the key to remain pressed even after you release it. This can happen due to dirt or debris getting stuck between the switch and the keycap.
- Bad PCB: If none of the above solutions work, it is possible that the PCB itself is faulty. This is rare, but it can happen due to a manufacturing defect or damage to the circuitry.
How to Fix Non-Functioning Keys on a Mechanical Keyboard
- Check the Switches: The first step in fixing non-functioning keys is to check the switches. Make sure they are all securely attached to the PCB and that none of them are loose or detached. If you find a loose switch, you can try to reseat it by gently pressing it back into place.
- Clean the Keyboard: If the switches are all securely attached, the next step is to clean the keyboard. Use a can of compressed air to blow out any dust or debris that may be trapped between the switches. You can also use a soft-bristled brush to remove any dirt or debris that may be stuck between the switches.
- Remove and Clean the Keycaps: If the above steps do not work, the next step is to remove the keycaps and clean them. Use a keycap puller to remove the keycaps and then clean them with a soft cloth and a mild cleaning solution. Be careful not to use too much force when pulling the keycaps, as this can damage the switches.
- Check the PCB: If none of the above solutions work, it is possible that the PCB is faulty. You can use a multimeter to test the continuity of the circuitry and see if there are any breaks or short circuits. If you find any issues with the PCB, you may need to replace it.
Non-functioning keys can be frustrating, but they are not always a sign of a serious problem. In most cases, the issue can be fixed by checking the switches, cleaning the keyboard, or removing and cleaning the keycaps. If none of these solutions work, it is possible that the PCB itself is faulty, and you may need to replace it. By following these steps, you can ensure that your mechanical keyboard is working properly and enjoy its durability and longevity for years to come.
Key Sticking
Key sticking is a common issue that can occur with mechanical keyboards. This occurs when a key does not fully return to its original position after being pressed, or when it feels like it requires more force to press than usual. This can be caused by a variety of factors, including a dirty or damaged switch, a misaligned keycap, or a problem with the keyboard’s PCB.
If you are experiencing key sticking on your mechanical keyboard, here are some steps you can take to fix it:
- Clean the Switch: Dirt or debris can accumulate inside the switch and cause it to stick. To clean the switch, you will need to remove the keycap and use a can of compressed air to blow out any debris. You can also use a small brush to remove any stubborn dirt or debris. Once the switch is clean, test the key to see if the issue has been resolved.
- Replace the Switch: If cleaning the switch does not fix the issue, the switch may be damaged and need to be replaced. To replace the switch, you will need to desolder the old switch and solder in a new one. This can be a complex process, so it’s best to have some experience with soldering before attempting this.
- Check the Keycap: Sometimes, a misaligned or damaged keycap can cause the key to stick. To fix this, simply remove the keycap and reposition it on the stem of the switch. If the keycap is damaged, you may need to replace it.
- Check the Stabilizers: Stabilizers are the parts of the keyboard that keep the larger keys stable when pressed. If a stabilizer is damaged or misaligned, it can cause the key to stick. To fix this, you will need to remove the keycap and inspect the stabilizer. If it is damaged or misaligned, you may need to replace it.
- Check the PCB: If none of the above steps resolve the issue, the problem may be with the keyboard’s PCB. This can be a more complex issue and may require the assistance of a professional. However, you can try resetting the keyboard’s firmware or updating the firmware to see if this resolves the issue.
Overall, key sticking can be a frustrating issue to deal with, but with some troubleshooting and patience, you can often resolve the issue and get back to typing smoothly on your mechanical keyboard.
Phantom Keypresses
Phantom keystrokes, also known as ghost keystrokes or phantom key presses, occur when a mechanical keyboard registers a keystroke without the user actually pressing the key. This can be a frustrating issue as it can cause the computer to register unwanted input, leading to errors or unwanted commands.
Phantom keystrokes can be caused by several factors, including:
- Electrical interference: This can be caused by other electronic devices or cables that are close to the keyboard, causing signals to be sent to the keyboard without the user actually pressing a key.
- Mechanical issues: This can be caused by debris or dirt on the keyboard, or the keyboard’s mechanical switches being damaged or worn out.
- Firmware issues: This can be caused by outdated firmware or a bug in the firmware.
To fix phantom keystrokes, here are some steps you can take:
- Clean the keyboard: Use compressed air or a brush to remove any debris or dirt that may be causing the keys to register falsely.
- Check for mechanical issues: If cleaning the keyboard doesn’t work, you may need to open up the keyboard and check for any mechanical issues, such as damaged or worn out switches.
- Update firmware: Check if there are any firmware updates available for your keyboard and update it if necessary. This can help fix any bugs or issues that may be causing phantom keystrokes.
- Shielding: You can use aluminum foil or conductive tape to shield the PCB from electrical interference.
- Replace the PCB: If all else fails, you may need to replace the keyboard’s PCB entirely. This can be a more expensive option, but it will ensure that the keyboard is functioning properly without any phantom keystrokes.
Overall, phantom keystrokes can be a frustrating issue to deal with, but with some troubleshooting and maintenance, you can fix the problem and enjoy your mechanical keyboard without any unwanted input.
Ghosting
Ghosting on a mechanical keyboard PCB occurs when a keyboard fails to recognize simultaneous key presses. It happens when multiple keys are pressed at the same time, but the keyboard only registers some of them or none at all. This can be frustrating for gamers or users who need to input multiple commands simultaneously.
Ghosting happens because of a limitation of the keyboard’s circuitry design. Most mechanical keyboards use a matrix circuit design where each key is assigned a unique electrical pathway. These pathways are arranged in rows and columns, and when a key is pressed, it completes a circuit between a particular row and column.
The problem occurs when two or more keys that share the same row or column are pressed simultaneously. This creates a conflict in the electrical pathways, and the keyboard cannot differentiate which key was pressed, resulting in ghosting.
To fix ghosting on a mechanical keyboard PCB, there are several options:
- Switch to a keyboard with anti-ghosting technology: Modern mechanical keyboards are equipped with anti-ghosting technology that can recognize and register multiple simultaneous key presses. This is the easiest and most effective solution.
- Use a software fix: Some keyboard manufacturers offer software that can remap the keyboard to avoid ghosting. This is a good solution if your keyboard doesn’t have anti-ghosting technology.
- Modify the keyboard: If you have the technical expertise, you can modify the keyboard’s circuitry to add diodes that will prevent ghosting. This requires some knowledge of electrical engineering and soldering.
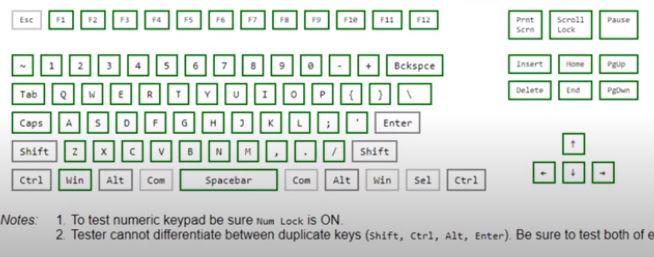
- Use a key rollover test: There are several online key rollover tests that can help you identify which keys are affected by ghosting. Once you know which keys are affected, you can avoid pressing them simultaneously.
In conclusion, ghosting on a mechanical keyboard PCB can be frustrating, but it can be fixed. Upgrading to a keyboard with anti-ghosting technology is the easiest and most effective solution. If that’s not possible, software fixes or modifications to the keyboard’s circuitry can help. Finally, using a key rollover test can help you identify the problem keys and avoid pressing them simultaneously.
Dead PCB
A dead PCB on a mechanical keyboard occurs when the printed circuit board (PCB) stops functioning, resulting in the keyboard not working. This can happen due to a variety of reasons such as physical damage, corrosion, or a manufacturing defect.
To fix a dead PCB on a mechanical keyboard, you can follow these steps:
- Check for physical damage: Inspect the PCB and check if there are any visible signs of physical damage, such as a cracked board, broken traces, or loose connections. If you find any damage, it’s best to replace the PCB altogether.
- Test the diodes: Diodes are components that allow current to flow in only one direction. A dead diode can prevent the keyboard from functioning correctly. To test the diodes, you’ll need a multimeter. Set the multimeter to the diode testing mode, and test each diode individually. If you find any dead diodes, you’ll need to replace them.
- Check the microcontroller: The microcontroller is the brain of the keyboard, and if it’s dead, the keyboard won’t work. To test the microcontroller, you’ll need to use a programmer. Connect the programmer to the microcontroller, and use software to check if the microcontroller is functioning correctly. If the microcontroller is dead, you’ll need to replace it.
- Clean the PCB: Corrosion can cause the PCB to stop functioning. To clean the PCB, use a soft-bristled brush and isopropyl alcohol to remove any dirt or corrosion. Be gentle, as excessive force can damage the PCB further.
- Replace the components: If you find any dead diodes, capacitors, or other components, you’ll need to replace them. Make sure to use the correct components as specified in the keyboard’s documentation.
- Resolder any loose connections: If you find any loose connections on the PCB, use a soldering iron to reflow the solder and reestablish the connection.
- Test the keyboard: Once you’ve completed the above steps, reassemble the keyboard and test it to see if it’s working correctly. If it’s still not functioning, you may need to consult with a professional or replace the PCB altogether.
In summary, a dead PCB on a mechanical keyboard can be caused by a variety of factors, including physical damage, corrosion, or faulty components. To fix the issue, you’ll need to inspect the PCB for damage, test the diodes and microcontroller, clean the PCB, replace any dead components, resolder any loose connections, and test the keyboard to see if it’s working correctly.
LED/RGB Issues
LEDs and RGB lighting are popular features in mechanical keyboards. However, they can also cause issues on the PCB (printed circuit board) of the keyboard.
The most common issues related to LED and RGB lighting on a mechanical keyboard PCB include:
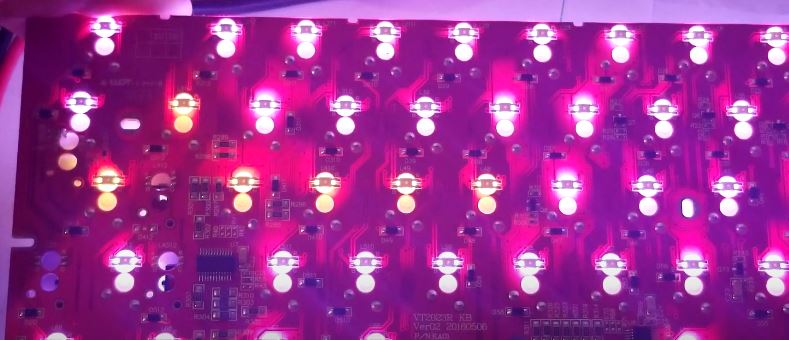
- Hotspots: Hotspots occur when the LED or RGB lighting is not evenly distributed across the keycap. This results in some keys appearing brighter than others. Hotspots can be caused by a number of factors, including the size of the LED, the position of the LED on the PCB, and the quality of the keycap.
- Uneven lighting: Uneven lighting occurs when some keys are significantly brighter than others. This can be caused by a variety of factors, including the quality of the PCB, the quality of the LED, and the position of the LED on the PCB.
- Flickering: Flickering occurs when the LED or RGB lighting appears to turn on and off rapidly. This can be caused by a variety of factors, including a faulty LED, a loose connection, or an incompatible PCB.
To fix these issues, there are a number of things that you can do:
- Check the quality of the PCB: The quality of the PCB can have a significant impact on the quality of the lighting. If the PCB is poorly made or designed, this can cause hotspots, uneven lighting, and flickering. Consider upgrading to a higher quality PCB if necessary.
- Check the quality of the LED: The quality of the LED can also have a significant impact on the quality of the lighting. Cheap or low-quality LEDs can cause hotspots, uneven lighting, and flickering. Consider upgrading to a higher quality LED if necessary.
- Adjust the position of the LED: The position of the LED on the PCB can also affect the quality of the lighting. If hotspots or uneven lighting is an issue, consider adjusting the position of the LED to create more even lighting.
- Check for loose connections: Flickering can be caused by loose connections between the LED and the PCB. Check all connections to ensure they are secure and tight.
- Consider using a different firmware: In some cases, flickering can be caused by incompatible firmware. Consider using a different firmware if you are experiencing this issue.
In summary, LED and RGB lighting are popular features in mechanical keyboards, but they can also cause issues on the PCB. To fix these issues, you can upgrade the quality of the PCB and LED, adjust the position of the LED, check for loose connections, and consider using a different firmware.
PCB Damage
Mechanical keyboards are popular among gamers and professionals because of their durability and responsiveness. The Printed Circuit Board (PCB) is a critical component of a mechanical keyboard. It connects the switches, keycaps, and other electronic components. However, like any other electronic device, PCBs can get damaged over time due to various reasons, such as moisture, dust, physical impact, and wear and tear.
PCB damage can cause various issues, such as unresponsive keys, stuck keys, or erratic behavior. Here are some common causes of PCB damage and how to fix them:
- Moisture damage: If the keyboard gets exposed to water or other liquids, it can damage the PCB. Water can cause corrosion and short circuits, which can lead to malfunctioning keys. To fix this issue, you can try drying the keyboard with a towel and leaving it in a dry place for a few days. You can also use a hairdryer on low heat to dry the keyboard, but make sure you don’t overheat the PCB.
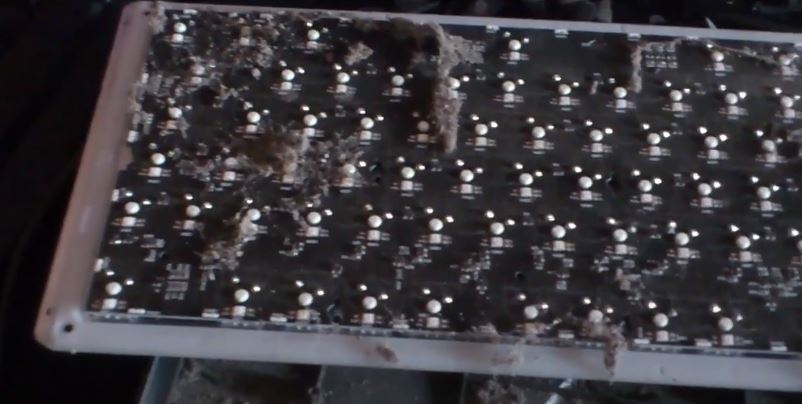
- Dust and dirt: Dust and dirt can accumulate on the PCB over time, causing it to malfunction. To fix this issue, you can clean the PCB with a soft-bristled brush or a can of compressed air. Make sure you disconnect the keyboard from the computer and remove the keycaps before cleaning the PCB.
- Physical impact: If the keyboard gets dropped or hit, it can damage the PCB. The damage can range from a broken trace to a cracked PCB. To fix this issue, you may need to replace the damaged components or the entire PCB. You can contact the manufacturer or a professional repair service to get the PCB replaced.
- Wear and tear: Over time, the switches and other components can wear out, causing the PCB to malfunction. To fix this issue, you can replace the worn-out components with new ones. You can also consider upgrading the keyboard to a new PCB or a better model.
In conclusion, PCB damage can cause various issues on a mechanical keyboard, but most of them can be fixed with some basic troubleshooting and maintenance. If the damage is severe or beyond your expertise, you can seek help from a professional repair service or contact the manufacturer for warranty or replacement options.
Prevention and Maintenance
Prevent dust and debris buildup
One of the most common issues with mechanical keyboard PCBs is dust and debris buildup. This can cause keys to stick or become unresponsive. To prevent this from happening, it’s important to regularly clean your keyboard. You can use compressed air or a soft-bristled brush to remove any dirt or debris that has accumulated on the PCB.
Avoid liquid spills
Another common problem with mechanical keyboard PCBs is liquid spills. Spills can cause damage to the PCB and make keys unresponsive or completely non-functional. To avoid spills, it’s important to keep liquids away from your keyboard. If you do accidentally spill something on your keyboard, immediately turn it off, unplug it, and use a cloth to absorb as much liquid as possible. Allow the keyboard to dry completely before using it again.
Use a quality power source
Mechanical keyboards require a stable power source to function properly. If the voltage fluctuates or the power supply is unstable, it can cause damage to the PCB. To prevent this, use a high-quality power supply and avoid using adapters or power strips that are not designed for your keyboard.
Check for loose connections
Loose connections can also cause problems with mechanical keyboard PCBs. Make sure all connections are secure and tight, including the USB cable that connects the keyboard to your computer.
Keep the keyboard firmware up to date
Firmware updates can fix bugs and improve performance. It’s important to keep your keyboard firmware up to date to ensure it’s functioning properly. Check the manufacturer’s website for updates and follow the instructions carefully to avoid causing any damage to the PCB.
Be gentle with your keyboard
Mechanical keyboards are built to withstand heavy use, but they can still be damaged if handled roughly. Be gentle when cleaning your keyboard or when moving it from one location to another. Avoid dropping it or slamming it down on your desk.
Store your keyboard properly
When not in use, it’s important to store your keyboard properly. Keep it in a clean, dry location away from direct sunlight or extreme temperatures. This will help prevent dust buildup, damage from moisture, and other issues that can cause problems with the PCB.
By following these preventive measures and maintaining proper care, you can prevent and maintain mechanical keyboard PCB problems, thus ensuring that your keyboard will function properly for many years to come.
Conclusion
In conclusion, mechanical keyboard PCBs can encounter various problems that can impact the typing experience. Key chatter, non-functioning keys, key sticking, phantom key presses, and ghosting are all common issues that users may face. Dead PCBs, LED/RGB issues, and PCB damage can also occur, rendering the keyboard unusable. While some of these problems can be resolved through troubleshooting or replacement of the faulty component, it is important to note that prevention is key. Proper maintenance and care can help prevent these issues from arising in the first place, ensuring that your mechanical keyboard functions smoothly and efficiently for years to come.
FAQs
What is a PCB in a mechanical keyboard?
A PCB (Printed Circuit Board) in a mechanical keyboard is the component that connects the switches to the controller, enabling the keyboard to register keypresses and send the corresponding signals to the computer.
What are some common PCB problems in mechanical keyboards?
Some common PCB problems in mechanical keyboards include faulty connections, short circuits, and issues with the firmware. These problems can result in keys not registering properly, erratic behavior, and other issues that can affect the keyboard’s performance.
How do I know if my mechanical keyboard PCB is faulty?
You can test your mechanical keyboard PCB by checking for non-functional keys, erratic key inputs, and connectivity issues. You can also use a multimeter to test the voltage and resistance of the PCB.
Can I repair a faulty mechanical keyboard PCB?
Yes, you can repair a faulty mechanical keyboard PCB, but it requires knowledge of electronics and soldering skills. If the issue is a damaged trace or component, it can usually be fixed with replacement parts and some soldering.
How can I prevent PCB problems in my mechanical keyboard?
- Regularly clean your keyboard to prevent dirt and debris from accumulating.
- Use a wrist rest to reduce pressure on the PCB and prevent flexing.
- Avoid spilling liquids on your keyboard and keep it away from moisture.
Can I replace a faulty PCB in my mechanical keyboard?
Yes, it is possible to replace a faulty PCB in a mechanical keyboard, but the process can be complicated and may require soldering skills. It’s recommended to seek professional help or follow detailed instructions carefully.
How do I choose a good quality PCB for my mechanical keyboard?
For choosing a good quality PCB for your mechanical keyboard:
- Look for PCBs that support your desired layout and features
- Check the manufacturer’s reputation and reviews
- Ensure the PCB uses high-quality components
- Consider the price and warranty offered by the manufacturer.
What should I do if my mechanical keyboard PCB stops working suddenly?
If your mechanical keyboard PCB stops working suddenly, you can try the following:
- Check the connection to the computer and the USB cable
- Try connecting the PCB to a different computer or USB port
- Check for any visible damage or loose connections on the PCB
- Contact the manufacturer or a repair specialist for further assistance.
How much does it cost to replace a mechanical keyboard PCB?
The cost of replacing a mechanical keyboard PCB can vary depending on the specific model and brand, but typically ranges from $30 to $100.
What other components of a mechanical keyboard should I check if I suspect a PCB problem?
If you suspect a PCB problem with your mechanical keyboard, it’s also important to check the switches, keycaps, and wiring connections. These components can all impact the overall performance of your keyboard.
Kizaru is a fan, collector, and has a huge addiction to mechanical keyboards. Kizaru has a collection of dozens of mechanical keyboards that come in different sizes and use different switches. He also frequently contributes to various forums that discuss keyboards such as Reddit and GeekHack.
