
Last Updated on December 4, 2023
Modding your mechanical keyboard can be a fun and rewarding experience. It allows you to personalize your keyboard to your liking and improve its overall performance. One of the most common modifications that keyboard enthusiasts make is to their stabilizers. However, there are some mistakes that are frequently made when modding stabilizers. In this article, we will discuss the top mistakes when modding your stabilizers and how to avoid them.
What Are Mechanical Keyboard Stabilizers and Why They Matter?
A mechanical keyboard stabilizer is a small mechanical component that helps to keep larger keys stable when pressed. These keys include things like the spacebar, enter key, and shift key. Without stabilizers, these larger keys can wobble or feel uneven when pressed, which can be frustrating and affect your typing or gaming performance.
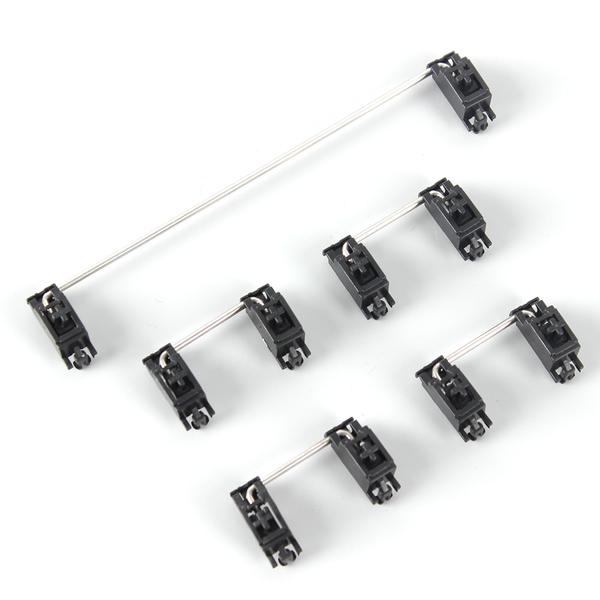
Mechanical keyboard stabilizers typically consist of a few parts, including a metal wire or plastic bar, two stabilizer inserts, and sometimes a small piece of lubricant. The wire or bar is inserted into the stabilizer inserts, which are then clipped onto the keyboard plate or PCB. When you press a key with a stabilizer, the wire or bar helps to distribute the force evenly across the keycap, keeping it level and stable.
So why do mechanical keyboard stabilizers matter? Well, as I mentioned earlier, they help to keep larger keys stable and consistent when pressed. This can improve your typing accuracy and gaming performance, as well as make the keyboard feel more comfortable to use. Additionally, some stabilizers are designed to reduce noise or improve the feel of the keypress, making for a more satisfying typing or gaming experience.
Overall, mechanical keyboard stabilizers are a small but important component of a high-quality mechanical keyboard. Whether you’re a gamer, typist, or just someone who appreciates a good keyboard, a set of well-designed stabilizers can make a big difference in how your keyboard feels and performs.
Why Modding Your Mechanical Keyboard Stabilizers?
When it comes to mechanical keyboards, one of the most important components are the stabilizers. These are the parts that help to keep your keys level and reduce any wobbling or unevenness when you press them.
While most mechanical keyboards come with pre-installed stabilizers, they may not be the best quality or fit for your particular keyboard. This is where modding your stabilizers comes in.
Modding your stabilizers involves making modifications to improve their performance and reduce any unwanted noise or movement. This can include things like lubing the stabilizers, clipping the legs, and even replacing the stabilizers altogether with higher quality ones.
Lubing your stabilizers involves applying a special lubricant to the moving parts of the stabilizers. This can help to reduce any unwanted noise or rattling that can occur when pressing the keys. It can also make the stabilizers feel smoother and more consistent, which can improve your typing experience.
Clipping the legs of the stabilizers involves removing a small piece of plastic from the bottom of the stabilizer. This can help to reduce any wobbling or unevenness when pressing the keys, and can make the keys feel more stable overall.
Replacing your stabilizers with higher quality ones can also be an option. There are many aftermarket stabilizers available that can offer improved performance and durability over the stock ones that come with your keyboard.
Overall, modding your stabilizers can be a great way to improve the overall feel and performance of your mechanical keyboard. It may take some time and effort to get it right, but the end result can be a much more satisfying typing experience.
Top Mistakes When Modding Your Stabilizers
Mistake #1: Dont’t Know What Kind of Stabilizer You Have
If you’re new to the world of mechanical keyboards, you may dont know that there are different types of stabilizers. There are three main types: Cherry stabilizers, Costar stabilizers, and ZealPC stabilizers. Cherry stabilizers are the most common type and are the easiest to modify. Costar stabilizers are a bit more difficult to work with, but you can still lube them if you want. ZealPC stabilizers are high-quality and may don’t need any mods at all.
Cherry stabilizers are the easiest to work with and are the most commonly modified. They are also the cheapest, costing only about $2 each. In their natural state, Cherry stabilizers aren’t the best, but after you modify them by clipping, lubing, and band-aid modding, they will feel and sound much better. This will also reduce any rattle or noise they may produce.
If you have Costar stabilizers, you cannot clip them because they do not have any moving feet to clip. They also have a wire that connects to an insert that goes into the keycap, making them a bit more annoying to use. However, you can still lube them to improve their feel and sound.
Overall, understanding the type of stabilizer you have is important if you want to improve your mechanical keyboard’s feel and sound. Cherry stabilizers are the easiest to work with, but all three types can benefit from mods such as clipping, lubing, and band-aid modding.
Mistake #2: Know What Kind of Mounting Your Stabilizers Use
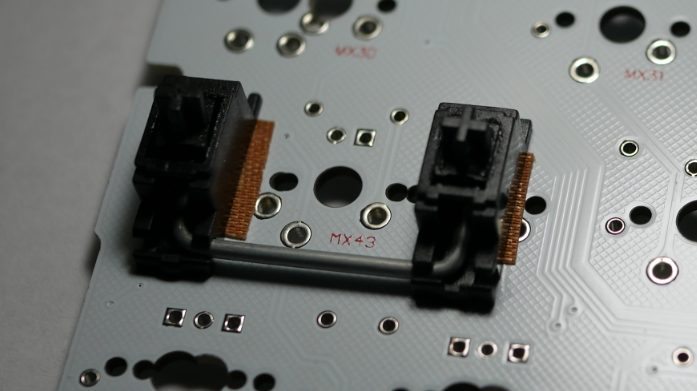
When installing stabilizers in your keyboard, it’s important to know what kind of mounting system they use. There are different types, such as PCB snap-in, PCB screw-in, plate-mounted, or hook in.
If your stabilizers are PCB snap-in, it’s easy to remove them. You just need to open up your keyboard to access the PCB, turn it around, and use your fingers or pliers to pop the stabilizers out.
However, PCB screw-in stabilizers require a screwdriver to remove them. They are the most secure type of stabilizers and have the least rattle. For Costar stabilizers, you can simply pull them out of the plate, but make sure not to lose the inserts that are attached to the keycaps.
The Massdrop CTRL keyboard has plate-mounted stabilizers. If you need to remove them, you will have to take off the plate to access them.
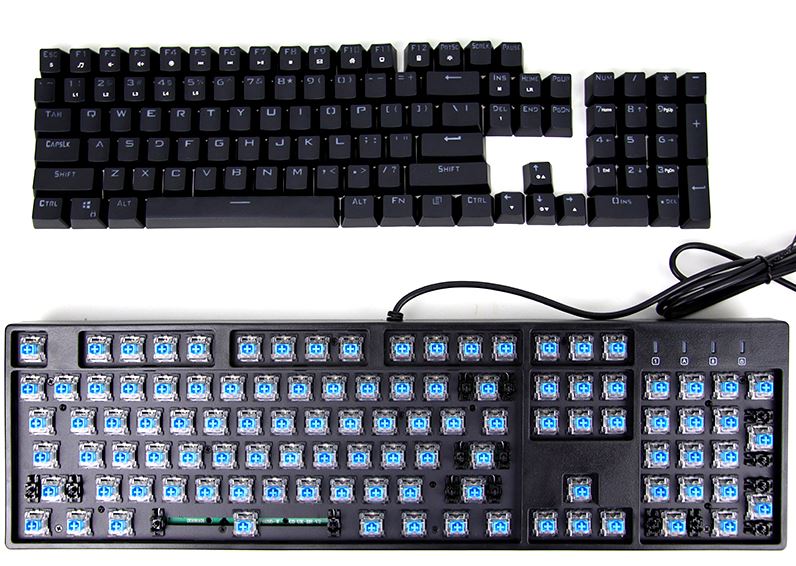
Here’s how I changed my Cherry stabilizers on my Drop CTRL keyboard, in a way that’s easy to understand for beginners:
- First, unplug your keyboard from any power source.
- Flip the keyboard over and remove all the screws you can see. Keep them somewhere safe.
- Take off all the keycaps and switches and keep them safe too.
- Remove the PCB (printed circuit board) from the plate.
- Push the stabilizers up and carefully take them out.
- Pull the wire out of each stabilizer.
- Lubricate each part, clip the stems, and add a band-aid to the PCB to make sure everything works smoothly.
- Put everything back together.
Just make sure you have all the supplies you need before you start taking apart your keyboard. You might need a screwdriver, keycap puller, switch puller, dielectric grease, paintbrush, band-aids, scissors, and a flush cutter. I used pliers and twisted off the little legs, and that worked well for me.
Mistake #3: Not Taking a Picture of Your Keyboard Prior to Taking it Apart
One common mistake people make when taking apart their keyboard is not taking a picture of it beforehand. This can cause problems when putting it back together, as you may forget where certain keys or components go.
To avoid this issue, it’s a good idea to take pictures of your keyboard from different angles before you start taking it apart. This way, you’ll have a reference to look at when you’re reassembling it. Some keyboards have unique layouts, so it’s especially important to take pictures if you’re not familiar with your keyboard’s design.
Even if you think you know where everything goes, it’s easy to make mistakes and misplace keys or components. Taking pictures will help ensure that everything goes back in the right place.
If you’re taking apart your stabilizers (the parts that keep your larger keys stable), it’s also a good idea to take pictures. These can be tricky to put back together, and it’s important to make sure the wires are facing the right way. This is especially true for Costar and Cherry stabilizers, which have specific requirements for wire placement.
Overall, taking pictures before you start taking apart your keyboard can save you a lot of time and hassle in the long run.
Mistake #4: Not understanding how stabilizers work
Stabilizers are an important component in many mechanical keyboards. They are responsible for ensuring that each keypress is consistent and feels the same every time, regardless of where the key is pressed. Without stabilizers, some keys may wobble or feel mushy when pressed off-center, which can lead to a less enjoyable typing experience.
Common misconceptions about stabilizers include that they are only necessary for larger keys, such as the spacebar, and that they are interchangeable between different keyboard models. However, both of these assumptions are false. While larger keys do require stabilizers in order to prevent them from wobbling, smaller keys such as the shift or enter keys may also benefit from stabilizers. Additionally, not all stabilizers are created equal. Different keyboard models may use different types or brands of stabilizers, and attempting to swap them out without understanding the specific requirements of the keyboard can lead to poor performance or even damage to the keyboard.
It’s important to understand how stabilizers work before attempting to modify them because it can be easy to accidentally damage or break them. For example, some people may try to lubricate their stabilizers in order to make them feel smoother or quieter, but using the wrong type of lubricant or applying too much can actually cause the stabilizers to malfunction. Similarly, attempting to swap out stabilizers without understanding the specific requirements of the keyboard can lead to compatibility issues or even breakage.
In summary, stabilizers are an important component in many mechanical keyboards that ensure consistent and enjoyable typing experiences. It’s important to understand how they work and their specific requirements before attempting to modify or replace them in order to avoid potential damage or compatibility issues.
Mistake #5: Using the wrong lubricant
Firstly, let’s talk about the different types of lubricants and their properties. There are many types of lubricants available, but the most commonly used in keyboard modding are oil-based and grease-based lubricants. Oil-based lubricants are generally thinner and have a lower viscosity, which means they flow more easily. Grease-based lubricants are thicker and have a higher viscosity, which means they stick to surfaces better. When choosing a lubricant, you need to consider its viscosity, as well as its composition and properties.
Next, let’s discuss which lubricants are best for stabilizer modding. For stabilizers, it is recommended to use a grease-based lubricant because they tend to stick to surfaces better and provide longer-lasting lubrication. Commonly used lubricants for stabilizer modding are Krytox GPL 205 and Tribosys 3204. These lubricants are specifically designed for keyboard modding and provide excellent results.
Finally, let’s talk about how to apply lubricant correctly. When applying lubricant, it’s important to use a small amount and to apply it evenly to the surfaces that require lubrication. You can use a brush or a syringe to apply the lubricant, but make sure you don’t use too much. Excessive lubrication can cause issues such as mushy keys or gummy switches. Additionally, you should avoid getting lubricant on other components of the keyboard, as this can cause damage.
In conclusion, using the wrong lubricant can have a negative impact on your keyboard’s performance. When modding your stabilizers, it’s important to choose a grease-based lubricant, such as Krytox GPL 205 or Tribosys 3204, and to apply it correctly. With the right lubricant and application, you can greatly improve the performance of your keyboard’s stabilizers and enhance your typing experience.
Mistake #6: Over-lubricating
Lubrication is often used to reduce the friction and noise created by the stabilizers, but it’s possible to use too much lubrication, which is called over-lubrication. Over-lubrication can lead to a number of problems, including reduced key travel, decreased tactile feedback, and a “mushy” feeling when typing.
Next, let’s talk about the signs that you’ve over-lubricated your stabilizers. One of the most common signs is that the keys will feel very sluggish or unresponsive. You may also notice that the stabilizers are making more noise than usual, even though you’ve lubricated them. Another sign is that the keys may feel uneven, with some keys feeling more mushy than others.
Finally, let’s talk about how to avoid over-lubrication. The key is to use the right amount of lubricant. When lubricating your stabilizers, use a small amount of lubricant and spread it evenly along the wire and plastic guide. It’s better to use too little lubricant than too much. You can always add more if needed, but it’s harder to remove excess lubricant once it’s applied. It’s also important to use the right type of lubricant. Many people recommend using a thin oil or grease specifically designed for use on mechanical keyboard switches and stabilizers.
Mistake #7: Under-lubricating
Under-lubrication refers to the lack of lubrication on the stabilizers of a mechanical keyboard. Stabilizers are the mechanisms that keep the larger keys, such as the spacebar, shift, and enter keys, stable and level when pressed. Without proper lubrication, the stabilizers can become stiff and squeaky, leading to an unpleasant typing experience. Under-lubrication can also cause wear and tear on the stabilizers, which can lead to them breaking or becoming loose.
There are a few signs that you may have under-lubricated your stabilizers. The first sign is that the larger keys may feel stiff or unresponsive when pressed. They may also make a squeaking or creaking sound when pressed. Additionally, the larger keys may feel uneven or wobbly when pressed, which can be a sign that the stabilizers are not working properly.
To avoid under-lubrication, it’s important to use the correct lubricant and apply it properly. The most commonly used lubricant for stabilizers is a type of grease called dielectric grease. This grease is non-conductive and will not damage the keyboard. To apply the grease, you can use a small brush or a toothpick to apply a small amount to the stabilizer wire. Be careful not to use too much grease, as this can cause the stabilizers to become too loose and wobbly. It’s also important to clean the stabilizers before applying the grease, as any dirt or debris can cause the lubrication to become less effective.
In summary, under-lubrication is a common problem that can occur with mechanical keyboards, specifically with the stabilizers. It can lead to a stiff and unpleasant typing experience and can also cause wear and tear on the stabilizers. Signs of under-lubrication include stiff or unresponsive keys, squeaking or creaking sounds, and uneven or wobbly keys. To avoid under-lubrication, it’s important to use the correct lubricant and apply it properly.
Mistake #8: Incorrectly clipping stabilizers
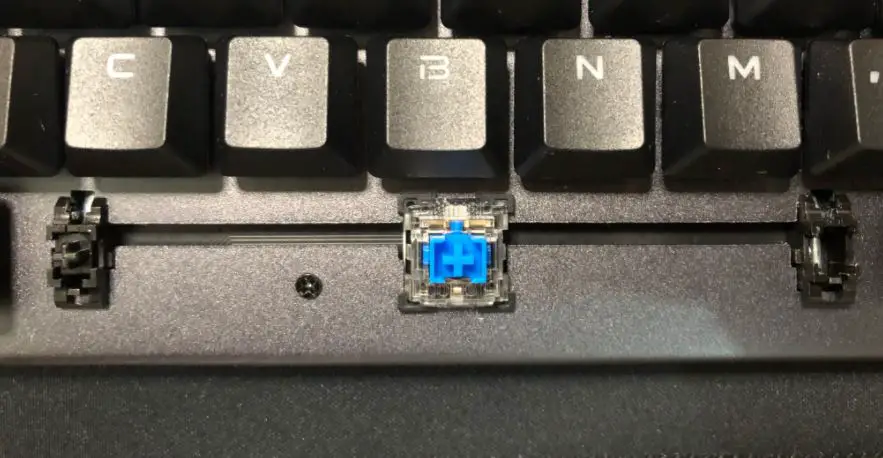
Stabilizer clipping involves modifying the stabilizers by removing some of the plastic protruding from them, so that the keycap can be mounted more easily and without any wobbling or sticking. Clipping stabilizers is a common modification made by enthusiasts and can improve the overall feel and performance of a mechanical keyboard.
However, there are common mistakes that can be made when clipping stabilizers. One mistake is not clipping the stabilizers enough, which can result in key wobbling or sticking. On the other hand, over-clipping the stabilizers can cause the keycap to not fit properly, leading to the keycap falling off or not being able to be pressed down properly. Another mistake is not being precise when clipping the stabilizers, which can lead to uneven key height and an inconsistent typing experience.
To properly clip stabilizers, first remove the keycap and the stabilizer wire from the switch. Then, use a pair of clippers to trim the protruding plastic on the stabilizer housing, taking care to not over-clip or under-clip. It’s important to clip evenly on both sides of the stabilizer to ensure the keycap remains level. Once the stabilizer has been clipped, reattach the wire to the stabilizer housing and test the keycap to ensure it sits flush and doesn’t wobble or stick. Repeat the process for all stabilizers on the keyboard.
Overall, stabilizer clipping can greatly improve the feel and performance of a mechanical keyboard. It’s important to take care and be precise when clipping stabilizers to avoid common mistakes and ensure an even and consistent typing experience.
Mistake #9: Using Low-Quality Stabilizers
Low-quality stabilizers may seem like a good deal because they’re cheaper, but they can actually cause a lot of problems in the long run. These stabilizers are more likely to rattle, bind, or even break, which can lead to a less enjoyable typing experience or even damage your keyboard.
So, when you’re purchasing stabilizers, it’s important to choose high-quality options from reputable brands. Some great options include GMK, Zeal, and Durock. These may be a bit more expensive, but they will provide a much better typing experience and last much longer than their low-quality counterparts.
Overall, modding your stabilizers can be a great way to improve your mechanical keyboard’s performance and make it your own. Just be sure to avoid using low-quality stabilizers to ensure that your modifications have a positive impact on your typing experience!
Mistake #10: Working in a Messy Place on the Floor

When working on your keyboard, it’s important to have a clean and organized workspace. Don’t work on the floor because it can be messy and take up a lot of time. Instead, use a large surface like a table or desk and cover it with paper towels to protect it from grease.
Grease can get on your fingers when you’re working with the keyboard, so it’s a good idea to have paper towels handy to clean them. It’s also helpful to use tweezers or thin tongs to hold onto the stabilizers when you’re adding lubricant, so you don’t get it on your fingers.
Make sure to sit in a comfortable chair to avoid putting too much pressure on your neck muscles. If you don’t have a comfortable chair, you could develop neck pain or strain. It can take a few hours to work on your keyboard, especially if you’re a beginner, so be patient and take your time to avoid making mistakes like putting the stems back in wrong.
Mistake #11: Not Testing Before Putting It All Back Together
When you’re working on your keyboard and putting things back together, it’s important to test everything before finishing up. One common mistake is forgetting to test the stabilizers, which can cause them to get stuck and not work properly.
To avoid this, after putting the stabilizers back in, make sure to test them with a switch to ensure they go down and back up smoothly. Also, check for any bent or stuck wire bits before putting the switches back in.
Before putting the keycaps back on, plug the keyboard in and test all the switches to make sure they work. If any don’t, take the switch out, fix it, and try again.
It can be frustrating to have to redo work, so it’s best to be thorough and make a checklist of things to check before putting everything back together. This way, you can avoid mistakes and make sure your keyboard works perfectly.
Conclusion
In conclusion, modding your mechanical keyboard stabilizers can be a fun and rewarding experience, but it’s important to avoid making some common mistakes. These mistakes can cause issues with the function and feel of your keyboard, and potentially even damage your components. By taking the time to educate yourself and carefully follow the steps for modding your stabilizers, you can achieve the desired results without any problems.
First, it’s crucial to know what kind of stabilizer you have and what kind of mounting it uses. This will help you select the correct components and avoid any compatibility issues. Additionally, taking a picture of your keyboard prior to taking it apart can be incredibly helpful when it comes to reassembly.
Understanding how stabilizers work is another important factor. This includes knowing how to properly lubricate them, which is where many people make mistakes. Using the wrong lubricant, over-lubricating, and under-lubricating can all cause problems with your stabilizers. It’s also important to clip your stabilizers correctly and use high-quality components.
Lastly, it’s important to work in a clean and organized space, and to test your keyboard before putting it all back together. By avoiding these common mistakes and taking the time to properly mod your stabilizers, you can enhance the performance and feel of your mechanical keyboard.
FAQs
What is a mechanical keyboard stabilizer?
A stabilizer is a mechanical keyboard component that helps keep larger keys, such as the spacebar, stabilized and level when pressed.
What are some common mistakes people make when modding their stabilizers?
Some common mistakes include using the wrong lubricant, over-lubricating or under-lubricating the stabilizer, not properly clipping or band-aid modding the stabilizer, and not correctly aligning the stabilizer wire.
What lubricant should I use when modding my stabilizers?
It’s best to use a specialized stabilizer lubricant, such as Krytox GPL 205g0 or Super Lube 21030, as using the wrong lubricant can cause damage to your keyboard.
What is over-lubrication and under-lubrication?
Over-lubrication is when you use too much lubricant, which can cause your stabilizer to feel mushy or unresponsive. Under-lubrication is when you use too little lubricant, which can cause your stabilizer to feel scratchy or squeaky.
What is clipping and band-aid modding?
Clipping involves removing a small piece of plastic from the stabilizer housing to reduce wobble. Band-aid modding involves placing a small piece of band-aid or foam between the stabilizer and the PCB to reduce noise and vibration.
How do I properly align the stabilizer wire?
Make sure the stabilizer wire is centered on the stem of the keycap and that the stabilizer housing is properly seated in the PCB before securing the wire in place.
Kizaru is a fan, collector, and has a huge addiction to mechanical keyboards. Kizaru has a collection of dozens of mechanical keyboards that come in different sizes and use different switches. He also frequently contributes to various forums that discuss keyboards such as Reddit and GeekHack.
