
Last Updated on December 8, 2023
Is your laptop keyboard can’t type letters? It’s a frustrating issue, but fear not! We’ve got you covered with step-by-step instructions to resolve this problem. Whether you’re using Windows 10, 7, or 8, follow these comprehensive guides to get your keyboard back in action.
What Makes a Laptop Keyboard Can’t Type Letters?
A laptop keyboard that suddenly stops typing letters can be a perplexing issue. There are several potential culprits behind this problem, and understanding them can help you diagnose and resolve the issue effectively. Here are some common factors that can cause a laptop keyboard to be unable to type letters:
- Hardware Malfunction: Physical damage or wear and tear can lead to a malfunctioning keyboard. Spills, drops, or excessive use over time can damage the keyboard’s internal components or connection to the laptop.
- Software Glitches: Software-related issues can also disrupt keyboard functionality. This may include driver conflicts, corrupted system files, or third-party software conflicts that interfere with keyboard input.
- Sticky or Stuck Keys: Individual keys on a laptop keyboard can become stuck due to debris, dust, or foreign particles lodged beneath the keys. This can prevent specific letters from registering when pressed.
- Enabled Accessibility Features: Features like Sticky Keys, Filter Keys, or Ease of Access settings in Windows can alter keyboard behavior. Accidentally enabling these features can result in issues with typing letters.
- Driver Problems: Outdated, corrupted, or incompatible keyboard drivers can cause various keyboard-related problems, including the inability to type letters.
- Fast Startup Feature: In some cases, Windows’ Fast Startup feature can lead to keyboard issues. Disabling this feature may resolve the problem.
- Malware or Viruses: Malicious software can interfere with keyboard input and other system functions. Running a thorough malware scan is essential to rule out this possibility.
- Physical Connection Issues: Sometimes, the keyboard’s ribbon cable connecting it to the laptop’s motherboard can become loose or damaged, resulting in a loss of letter typing capability.
- System Updates: After a system update or operating system upgrade, compatibility issues can arise, affecting keyboard functionality.
- User Error: Occasionally, users may mistakenly enable keyboard shortcuts or settings that inhibit letter typing. Reviewing keyboard settings and shortcuts is advisable.
To determine the specific cause of your laptop keyboard’s inability to type letters, you can start by troubleshooting these factors one by one. Begin with the simplest solutions, such as checking for physical obstructions or disabling accessibility features. If the issue persists, proceed to more complex solutions like updating drivers or performing system scans. In cases of hardware damage, professional repair or replacement may be necessary.
By identifying and addressing the root cause of the problem, you can restore your laptop keyboard’s functionality and resume typing letters without interruptions.
If Very Urgent: Turn On The Onscreen Keyboard
Accessing Settings: Begin by navigating to your device’s settings.

Ease of Access: Within the settings menu, locate and click on “Ease of Access.”
Keyboard Options: Look for the “Keyboard” section, usually found under the “Interaction” category.

Activate Onscreen Keyboard: Toggle the switch labeled “Use the Onscreen Keyboard” to the “On” position.

By following these steps, you can easily enable the onscreen keyboard on your device.
Disabling Sticky Keys
Turning Sticky Keys on and off in Windows 10 is a straightforward process. You have two primary methods to accomplish this. First, if Sticky Keys are currently active, you can disable them by rapidly tapping the Shift key five times. Alternatively, you can press any two keys simultaneously to turn off Sticky Keys.
If neither of these methods works for you or if you prefer to disable the shortcut through Windows Settings, follow these steps:
Step 1: Press the Windows key or click on the Windows icon located in the lower left-hand corner of your screen to access the Start menu.
Step 2: From the Start menu, select “Settings.”

Step 3: In the Settings window, click on “Ease of Access.”

Step 4: You can also quickly access this menu by pressing Win+U on your keyboard.
Step 5: Scroll down the Ease of Access menu and locate the “Sticky Keys” toggle. Set it to the “Off” position. You can also disable the shortcut from this menu.

Step 6: Continue scrolling down to the “Make It Easier To Type” section. Ensure that both the warning message and the audible notification options are enabled. This helps prevent accidentally enabling Sticky Keys.
How to Disable Sticky Keys on Windows 7 and 8
In Windows 7 and 8, you can also use the “press Shift five times” shortcut or simultaneously press two keys to enable or disable Sticky Keys. To manage Sticky Keys through the system settings, follow these steps:
- Step 1: Open the Control Panel.
- Step 2: Navigate to “Ease of Access” and click on “Make the Keyboard Easier To Use.”
- Step 3: For Windows 8 users, you can also press Win+U if your keyboard features a Windows key.
- Step 4: In the “Make it Easier To Type” section, you’ll find the option to “Turn on Sticky Keys.” Check or uncheck this option as desired, then select “Apply.”
By following these steps, you can easily control and configure Sticky Keys on your Windows 10, 7, or 8 computer to suit your preferences.
Disabling Filter Keys
Filter Keys are designed to assist individuals who may have difficulty pressing two keys simultaneously in order to access certain functions. However, there are instances when enabling Filter Keys can result in keyboard malfunctions. To deactivate Filter Keys, follow these steps:
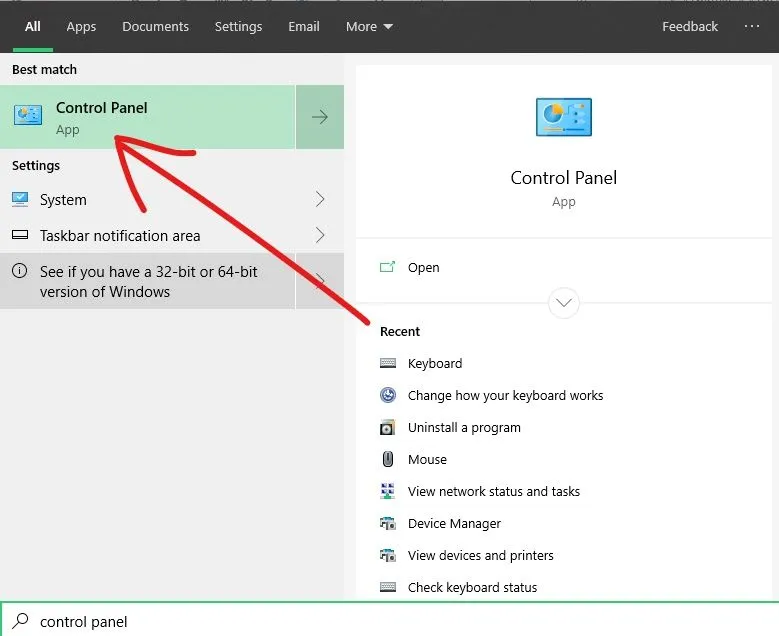
Step 1: Initiate the process by clicking on the Start menu and initiating a search for “Control Panel.” Subsequently, press ENTER to open the first search result, which invariably leads to the Control Panel.
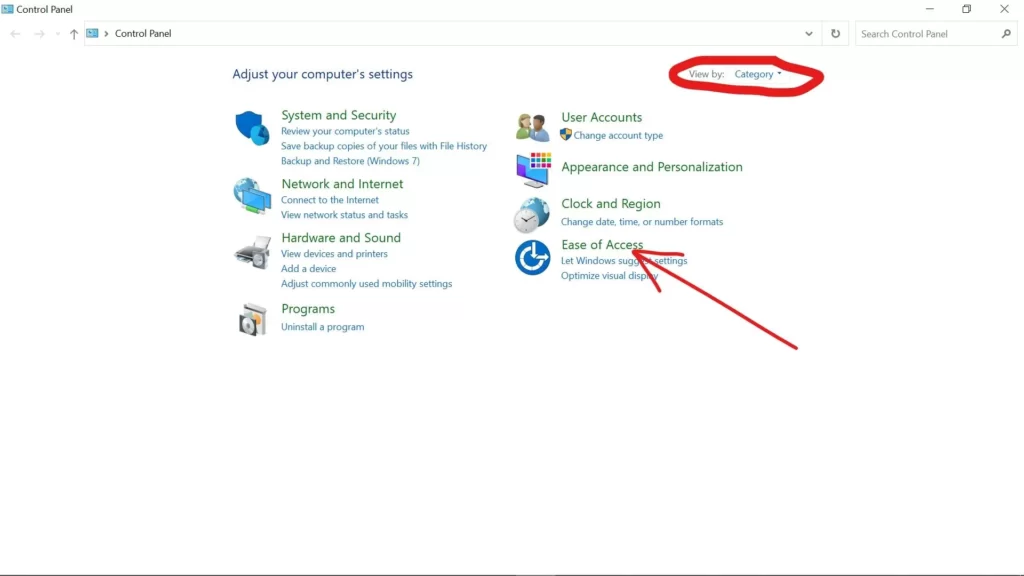
Step 2: Ensure that your view is set to “Category” rather than “Small Icons” or “Large Icons.” Then, select “Ease of Access.”
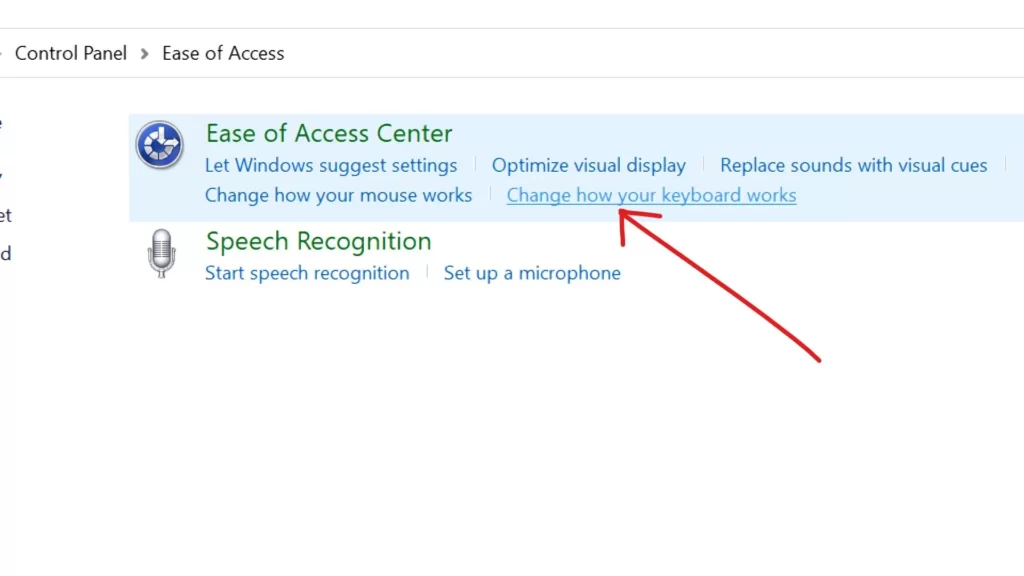
Step 3: Locate and click on the “Change how your keyboard works” link.
Step 4: Deselect the “Turn on Filter Keys” checkbox.
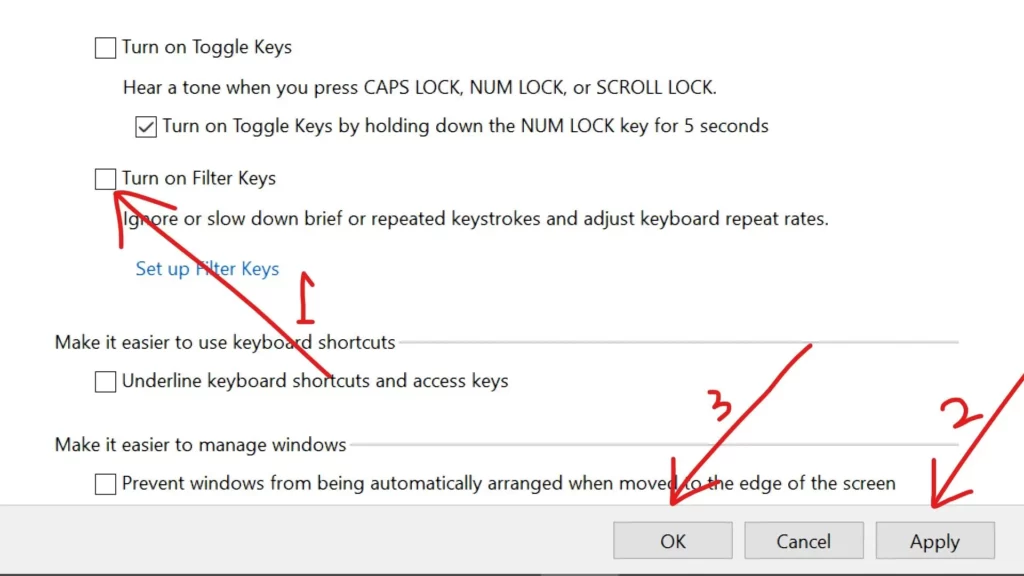
Step 5: To apply the changes, click “Apply,” followed by “OK.”
By following these steps, you can successfully disable Filter Keys on your keyboard.
Disabling Fast Startup
“Fast Startup is a Windows 10 feature designed to expedite the boot process of your computer. However, if you are encountering issues with an external keyboard not functioning properly, the Fast Startup feature might be the culprit. To resolve this issue, follow the steps below to disable Fast Startup:
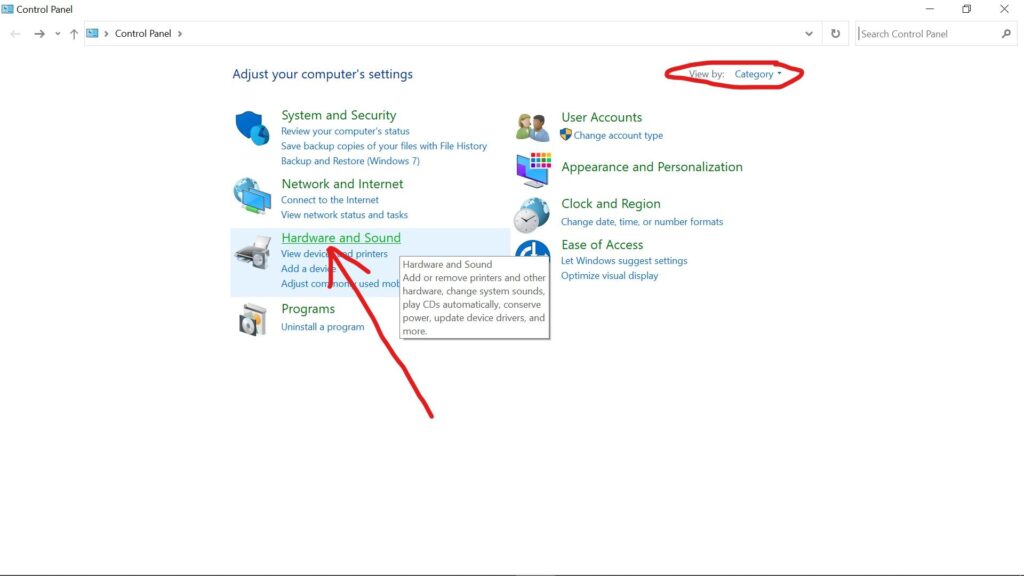
Step 1: Start by clicking on the ‘Start‘ button and searching for ‘Control Panel.’ Then, either click on the ‘Control Panel’ search result or press the ‘ENTER‘ key on your keyboard.

Step 2: Ensure that you are viewing items by category and then select ‘Hardware and Sound.’
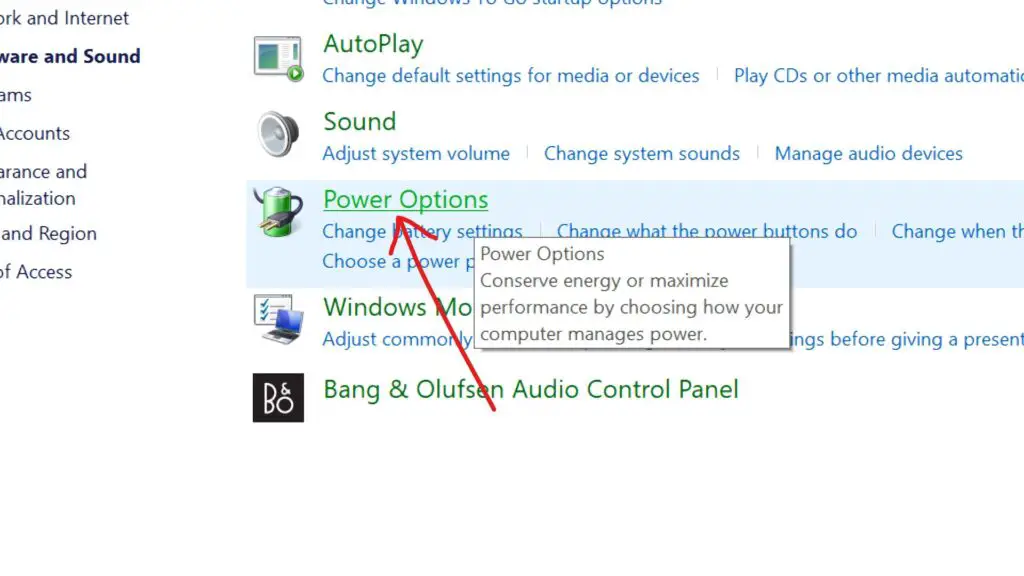
Step 3: Choose ‘Power Options‘ from the available selections.
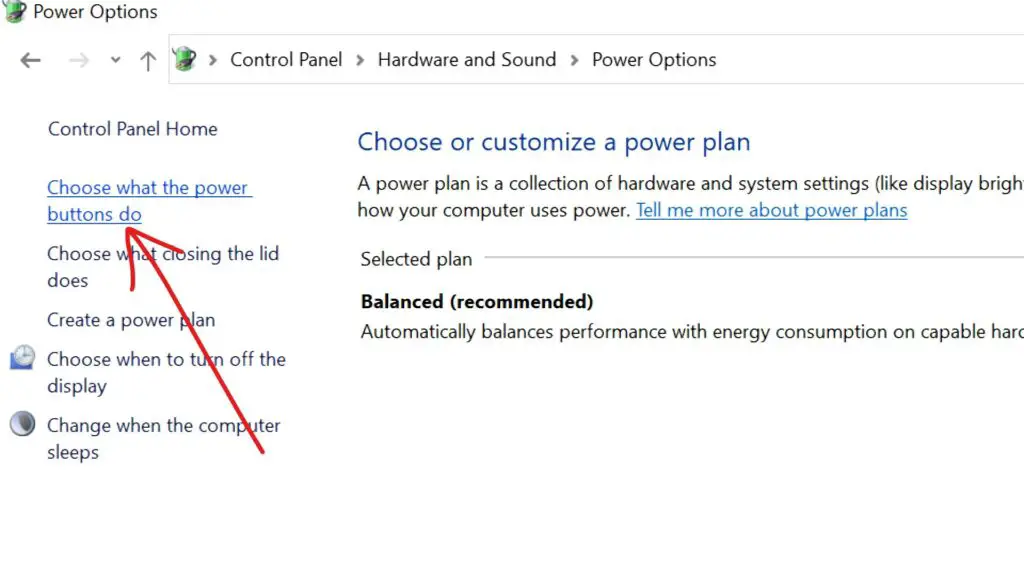
Step 4: Locate and click on the link that reads ‘Choose what the power buttons do.’
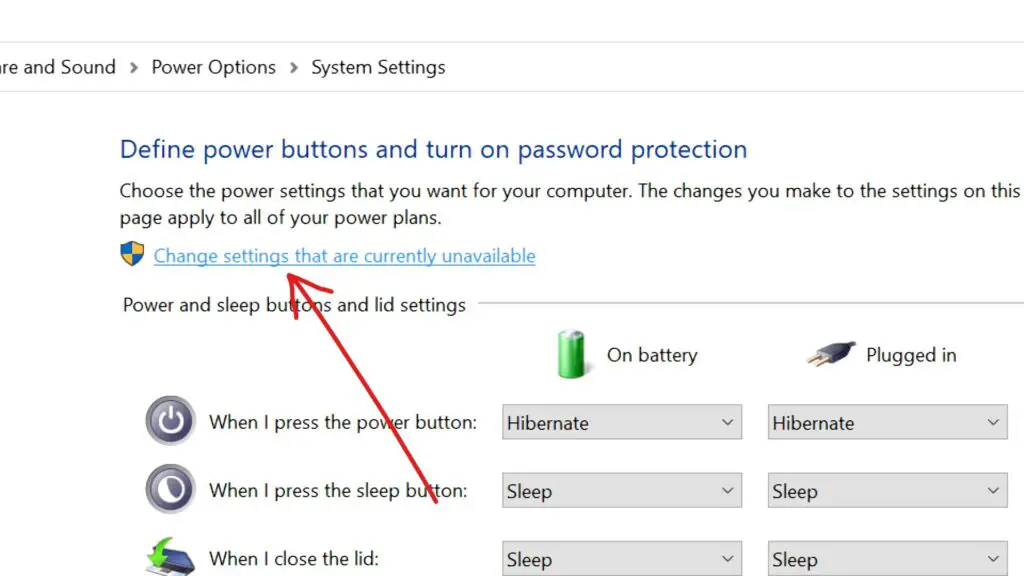
Step 5: Click on the ‘Change Settings that are currently unavailable’ link.
Step 6: Finally, uncheck the box next to ‘Turn on fast startup‘ and then click the ‘Save changes’ button.
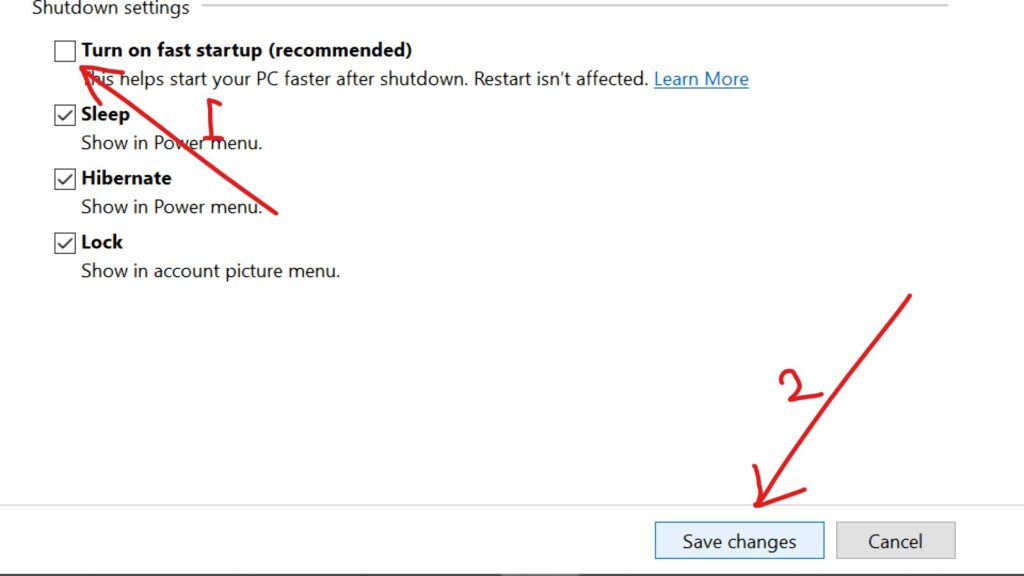
By following these steps, you can disable Fast Startup, which may help resolve any issues you’re experiencing with your external keyboard. If you require further assistance, please don’t hesitate to ask.”
Reinstall And Update Your Keyboard Driver
Reinstall Your Keyboard Driver
If you’re experiencing issues with your keyboard driver and need to reinstall it, follow these simple steps:
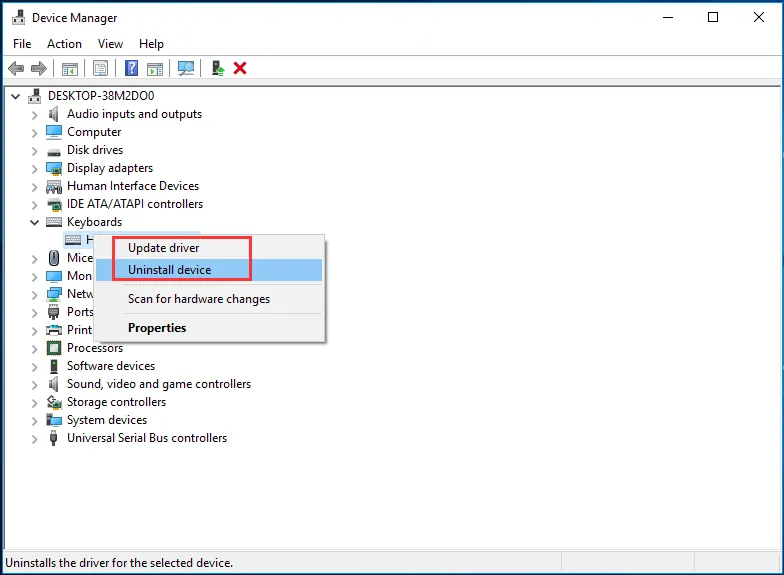
Step 1: Begin by right-clicking on the Start button to access the Windows menu, then select “Device Manager.”
Step 2: In the Device Manager window, locate and expand the “Keyboards” section. Next, right-click on your keyboard driver and choose “Uninstall device” from the context menu.
Step 3: After you’ve uninstalled the driver, it’s time to restart your Laptop/PC. Upon restarting, Windows will automatically detect and install the necessary keyboard driver for you.
By following these steps, you can quickly and easily reinstall your keyboard driver to resolve any related issues.
Updating The Keyboard Driver
A malfunctioning keyboard might be attributed to an outdated or corrupted driver. To resolve this issue, consider these steps for updating your keyboard driver:
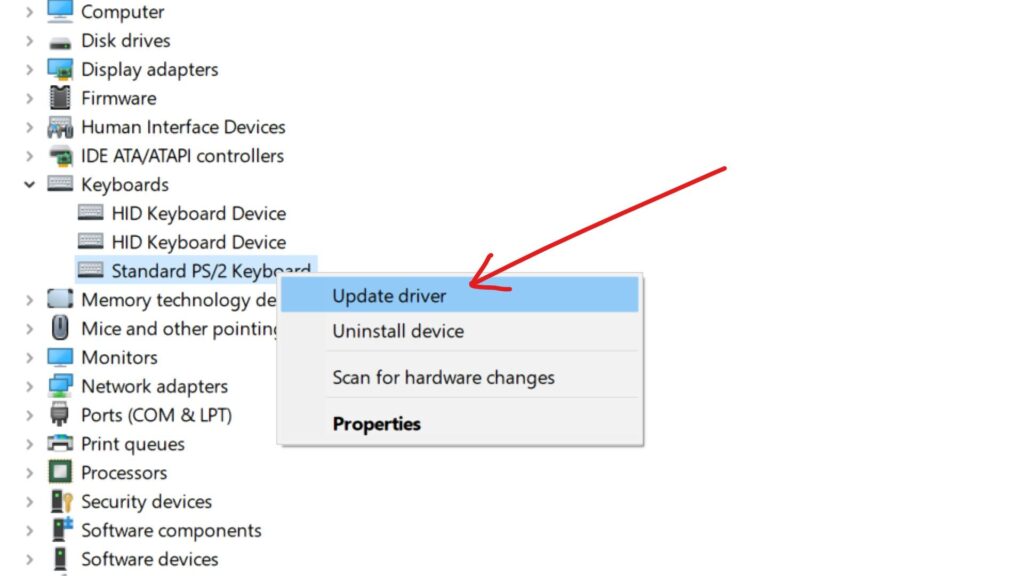
Step 1: Begin by right-clicking on the Start menu and choosing “Device Manager.”
Step 2: Expand the “Keyboards” category within Device Manager.
Step 3: Right-click on the keyboard that is experiencing issues and select “Update driver.”
Step 4: Opt for the “Search automatically for updated driver software” option.
Your computer will then proceed to scour the internet for the most recent drivers and install them accordingly.
Reboot Your Laptop/Computer
You can initiate a computer restart even without a keyboard by leveraging your mouse. Here’s a step-by-step guide on how to achieve this:
For Windows 10:
Step 1: Employ your mouse to click on the Start button located at the lower-left corner of your screen.
Step 2: Subsequently, click on the power icon, which resembles a circle with a vertical line through it.
Step 3: From the menu that appears, opt for the “Restart” option.
For Windows 7:
Step 1: Utilize your mouse to navigate to the Start button, typically situated in the lower-left corner of your desktop.
Step 2: Next, click on the icon featuring more options, which can typically be found near the Start button.
Step 3: Choose the “Restart” option from the expanded menu.
By following these simple steps, you can restart your computer seamlessly without needing a keyboard.
Clean The Keyboard
How to Effectively Clean and Disinfect Your Laptop Keyboard
Laptop keyboards, much like their desktop counterparts, tend to accumulate dirt and grime over time. Unfortunately, replacing them isn’t as simple, so it’s crucial to know how to properly clean and disinfect your laptop keyboard to keep it in tip-top shape. These steps also apply to cleaning your laptop’s trackpad.
Estimated Time: 10-15 minutes, depending on keyboard condition.
Cleaning Your Laptop Keyboard:
- Power Down and Unplug: First, turn off your laptop and disconnect it from any power source. Allow it to cool before proceeding.
- Use a Damp Microfiber Cloth: Gently wipe the keyboard with a slightly dampened microfiber cloth. Be cautious not to let any water seep into the laptop’s openings.
- Blast Away Crumbs: To remove crumbs and debris lodged between the keys, utilize a can of compressed air. Ensure you hold the can upright while spraying; never use it upside down.
- Optimal Airflow: Hold the laptop at a 75-degree angle and slightly tilt it backward. Use the compressed air, sweeping from left to right and top to bottom, for the best results.
Disinfecting Your Laptop Keyboard:
Occasionally, it’s essential to disinfect your laptop keyboard thoroughly to eliminate germs. Here’s how to do it safely:
- Avoid Bleach-Based Products: Never use disinfectant sprays or wipes containing bleach, as they can harm your keyboard’s surface.
- Power Off and Disconnect: Turn off your computer or laptop and unplug it from any power source.
- Use Disinfecting Wipes: Gently wipe the keyboard with a disinfecting wipe. If the wipe is overly wet, wring out excess liquid before use.
- Remove Moisture: After disinfecting, use a microfiber cloth to wipe away any moisture left on the keyboard.
- Final Drying: For a thorough finish, dry the keyboard once more with a soft, lint-free cloth, similar to those used for cleaning eyeglasses.
By following these steps, you can maintain a clean and hygienic laptop keyboard, ensuring both functionality and longevity.
Use External Keyboard
If you’re experiencing issues with your laptop’s built-in keyboard and it’s not functioning correctly, a simple solution is to connect an external USB keyboard to your laptop. In the majority of situations, this external keyboard should function seamlessly, regardless of whether the problem with your built-in keyboard is due to software or hardware issues. You can use the external keyboard to maintain your laptop’s functionality while you address the underlying problems or arrange for it to be serviced.
Consider To Professional Repair
If you’ve tried various solutions and your laptop keyboard is still not working, it may be time to consider professional repair.
Common Keyboard and Laptop Keyboard Issues:
Dealing with keyboard problems, whether on a standard keyboard or a laptop, can be a frustrating experience that significantly disrupts your workflow. Below, we outline some frequently encountered issues and potential solutions:
- Arrow Keys Malfunctioning: Arrow keys play a crucial role in navigating through documents, spreadsheets, and web pages. When these keys stop working, the culprit may be either hardware or software-related. Hardware issues could arise from dirt, debris, or physical damage to the keyboard, while software problems might stem from outdated drivers, malware, or conflicts with other software.
- Caps Lock Key Not Responding: The caps lock key enables users to type in uppercase letters. When it refuses to work, it could be due to a hardware malfunction or a software glitch. A simple solution might involve cleaning the keyboard, restarting the computer, or verifying the keyboard settings.
- Space Bar Issues: The space bar is fundamental for typing and separating words. If it’s unresponsive, the cause might be dirt, debris, or physical damage. A quick fix involves cleaning the keyboard or using compressed air to remove any obstructions.
- Malfunctioning Shift Key: The shift key is vital for typing uppercase letters and symbols. When it fails to function properly, it could be attributed to either software or hardware issues. Troubleshooting steps may include restarting the computer, reviewing keyboard settings, or updating drivers.
- FN Key Problems: The FN key is a function key primarily found on laptops, granting access to additional features like volume control, screen brightness, and keyboard backlighting. When the FN key becomes unresponsive, it could be a result of software or hardware issues. Attempt to resolve this by restarting the computer, checking the keyboard settings, or updating drivers.
How to Resolve Keyboard Issues: Arrow Keys, Capslock, Space Key, Shift Key, and FN Key Not Working
Experiencing problems with your keyboard or laptop keyboard, such as malfunctioning arrow keys, a non-responsive Capslock key, unresponsive Space key, inoperative Shift key, or a non-functional FN key, can be quite exasperating. Fortunately, here are some effective troubleshooting steps to rectify these issues:
- Check for Physical Damage: Begin by inspecting your keyboard for any visible physical damage, like cracks, spills, or debris lodged between the keys. Cleaning your keyboard with compressed air can help remove any potential obstructions.
- Restart Your Computer: Occasionally, simply restarting your computer can resolve keyboard problems by resetting any underlying software glitches that may be causing the issues.
- Update Keyboard Drivers: Outdated keyboard drivers can lead to specific keys not functioning correctly. You can update your drivers through the Device Manager in Windows or System Preferences in macOS.
- Disable Filter Keys: If your keyboard is typing slowly or not registering certain keys, it could be due to the Filter Keys feature being enabled. To disable this, navigate to the Control Panel (Windows) or System Preferences (macOS) and access the Ease of Access section.
- Check Language Settings: If you’re using a non-English language keyboard, ensure that your computer’s language settings are configured correctly. Verify that the appropriate language is selected within the Language settings of your operating system.
- Verify Keyboard Layout: An incorrect keyboard layout selection can lead to key malfunctions. Double-check your keyboard settings to ensure that the correct layout is chosen.
- Keyboard Cleaning: Dust and debris accumulation can cause keys to become sticky or unresponsive. Safely clean your keyboard using either a can of compressed air or a soft-bristled brush.
- Compatibility Check: If you recently installed a new operating system or software, it might not be compatible with your keyboard. Review the system requirements of the software to confirm compatibility with your keyboard.
- Consider an External Keyboard: If none of these solutions prove effective, you may need to use an external keyboard as a temporary workaround until you can repair or replace your laptop keyboard.
How to Prevent Future Keyboard Malfunctions
Ensuring your keyboard remains trouble-free in the future involves implementing the following practices:
- Maintain cleanliness: Routinely clean your keyboard to eliminate accumulated dirt, dust, or debris lurking beneath the keys. You can achieve this by using compressed air or a soft brush.
- Food and drink policy: To prevent any damage, it’s wise to avoid eating or drinking near your keyboard. Food crumbs and spills can harm its functionality.
- Guard against moisture: Safeguard your keyboard from any form of liquid, including water, and refrain from using it with wet hands.
- Utilize a keyboard cover: Invest in a keyboard cover to shield your device from dust, spills, and other potentially harmful particles.
- Handle with care: Adopt a gentle touch while typing and avoid any forceful impacts or slamming of your keyboard. Such actions can lead to damage, both externally and internally.
- Keep software up to date: Regularly update your operating system and keyboard drivers. This practice can mitigate software-related issues that may lead to keyboard malfunctions.
By adhering to these guidelines, you can ensure that your keyboard remains in optimal working condition, reducing the likelihood of future malfunctions.
Conclusion
In conclusion, a malfunctioning laptop keyboard that refuses to type letters can be a frustrating ordeal. However, with the comprehensive guides provided in this article, you have a wealth of solutions at your fingertips. From enabling the onscreen keyboard to troubleshooting issues like Sticky Keys, Filter Keys, and Fast Startup, we’ve covered it all. Additionally, we’ve walked you through the steps to reinstall and update your keyboard driver, restart your computer without a keyboard, and even maintain the cleanliness and hygiene of your laptop keyboard.
Remember, technology hiccups happen, but they don’t have to slow you down. By following these step-by-step instructions, you can regain control of your laptop keyboard and ensure it functions flawlessly. And if all else fails, don’t hesitate to seek professional repair services to get your laptop back in prime typing condition.
With the knowledge and solutions provided in this article, you can type away with confidence, knowing that you have the tools to address any keyboard-related issue that may arise.
Kizaru is a fan, collector, and has a huge addiction to mechanical keyboards. Kizaru has a collection of dozens of mechanical keyboards that come in different sizes and use different switches. He also frequently contributes to various forums that discuss keyboards such as Reddit and GeekHack.
