
Last Updated on November 17, 2023
Embark on a keyboard revolution as we unravel the mystery behind customizing your typing experience: “Can You Replace Switches on a Mechanical Keyboard?” Delve into the intricate world of switch pin configurations, brand compatibility, and the innovative realm of hot-swappable keyboards. Unleash your curiosity and transform your keyboard into a personalized masterpiece – the answers await in this exclusive exploration of mechanical keyboard customization.
Understanding Mechanical Switch Pins
The pins on mechanical switches play a crucial role as connectors between the switch and the PCB. They facilitate the transmission of electrical signals from the switch to the PCB, converting the input for the computer. Mechanical keyboard switches typically come in two varieties based on the number of pins: 3-pin and 5-pin.
Switch with 3 Pins
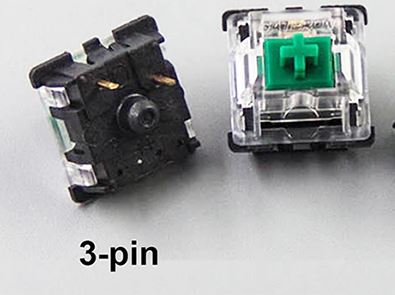
Switches with 3 pins feature a 2-pin design made of metal, often gold in color, and a round pin in the middle. While widely used in the market, these switches are less reliable for hot-swappable PCBs due to their limited grip, making them prone to slipping. It’s recommended to use 3-pin switches for standard PCBs.
Switch with 5 Pins
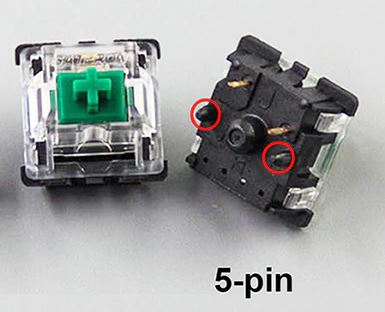
Switches with 5 pins offer enhanced stability, particularly on hot-swappable PCBs. The design includes a 2-pin metal structure, a round pin in the middle, and 2 plastic pins aligned with the round pin. While suitable for hot-swappable PCBs, 5-pin switches can also be used on standard PCBs by soldering only 2 pins.
Mechanical vs. Optical Switches
It’s crucial to note that mechanical switches cannot be replaced with optical switches. Optical switches employ a different bottom housing design and utilize a distinct PCB type. The working mechanism differs, with optical switches relying on infrared technology to register key presses by breaking the infrared line on the PCB, while mechanical switches use physical components for actuation.
Compatibility Between Mechanical Switch Brands
| Switches | PCB’S Shockets | Compatibility |
| Cherry MX | Cherry MX Shockets, Kailh Shockets, Gateron Shockets | Cherry MX Switches can be used on various types of PCB shocks such as Kailh shockets and Gateron Shockets. Cherry MX switches cannot be used on PCBs for Outemu Switches. |
| Gateron | Cherry MX Shockets, Kailh Shockets, Gateron Shockets | Because Gateron switches are Cherry MX clones, Gateron switches can also be used on PCB shocks that support Cherry MX switches such as Kailh shockets, Cherry MX Shockets, and Gateron Shockets. Gateron switches cannot be used on PCBs used for Outemu Switches. |
| Kailh | Cherry MX Shockets, Kailh Shockets, Gateron Shockets | Just like Gateron, Kailh is also a cloned switch from Cherry MX so it can use the same PCB shock as Cherry MX and Kailh, and Gateron. |
| Drop Switches | Cherry MX Shockets, Kailh Shockets, Gateron Shockets | Drop Switches are also compatible with PCB shockers that can use switches from Cherry MX, Gateron, and Kailh. |
| ZealPC Switches | Cherry MX Shockets, Kailh Shockets, Gateron Shockets | ZealPC Switches are also compatible with PCB shockers that can use switches from Cherry MX, Gateron, and Kailh. |
| Outemu Switches | Only PCB compatible for Outemu Switches | Outemu Switches that have a different design from Cherry MX, Gateron, Kalih and other cloned switches from Cherry MX cannot be used on PCBs for Cherry MX, Kailh, and Gateron. |
Various switch brands, such as Cherry MX, Gateron, Kailh, ZealPC, and others, share compatibility based on identical designs and pin positions. However, outliers like Outemu switches require specific PCBs due to differing designs.
Switch Compatibility Overview:
- Cherry MX: Compatible with Cherry MX, Kailh, and Gateron sockets.
- Gateron: Shares compatibility with Cherry MX, Kailh, and Gateron sockets.
- Kailh: Interchangeable with Cherry MX, Kailh, and Gateron sockets.
- Drop Switches: Compatible with Cherry MX, Kailh, and Gateron sockets.
- ZealPC Switches: Compatible with Cherry MX, Kailh, and Gateron sockets.
- Outemu Switches: Exclusive compatibility with designated PCBs.
Hot Swappable Keyboards: A Creative Twist
Hot-swappable switches bring a new level of creativity to keyboard users. This innovative technology allows users to replace their own keyboard switches in the event of damage and facilitates easy cleaning, addressing the common issue of dust ingress associated with mechanical switches.
Moreover, hot-swappable switch technology opens up exciting creative possibilities for users. By offering three distinct switch types—linear, tactile, and clicky—users can experiment with different combinations within a single keyboard. Each switch type has its own unique characteristics, and users can replace and mix switches to tailor the keyboard’s feel to their preferences.
Here are some tips for seamlessly replacing switches using this technology:
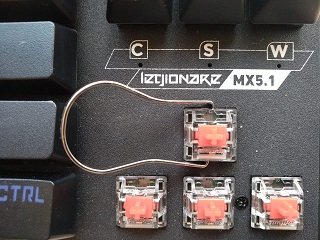
- Utilize a switch puller: Ensure your keyboard package includes a switch puller and extra switches. This metal clamp tool is designed for efficiently pulling switches.
- Remove keycaps: Take off the keycaps or keypad using your fingers or a keycap puller if provided.
- Secure the switch puller upright: Clamp the switch puller onto the switch’s designated attachment hole, maintaining an upright position to prevent bending the switch pins.
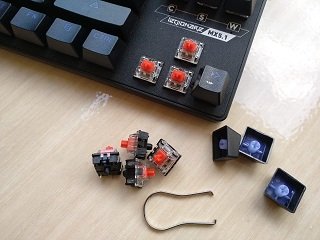
- Pull gradually and steadily: With the puller securely attached, pull the switch slowly and steadily in an upward direction. This may require a bit of effort, but a steady pull ensures a safe switch removal.
After removal, ensure the switch legs or pins remain straight to avoid potential breakage in the pin sleeve. While the process may seem intimidating initially, practice will enhance your comfort and confidence in replacing switches. This technology not only provides practical benefits but also encourages users to explore and personalize their keyboard experience.
Standard PCB Replacement: Desoldering and Soldering
Replacing switches on a standard PCB involves desoldering and soldering, making it a more intricate process compared to hot-swappable keyboards.
How to Replace Switches on a Standard PCB:
The video tutorial demonstrates the step-by-step process of replacing switches on a standard PCB, offering a visual guide for a more complex procedure.
Interchanging Switches Between Brands
Can You Replace Cherry MX Switches with Gateron Switches?
Yes, Cherry MX and Gateron switches, being clones, share the same design and pin positions. Interchanging them is feasible.
Can You Replace Cherry MX Switches with Kailh Switches?
Yes, Kailh switches, also Cherry MX clones, share the same PCB ports. Interchanging them is possible.
Can You Replace Gateron Switches with Kailh Switches?
Yes, Gateron and Kailh, both Cherry MX clones, are interchangeable on the same PCB.
Can You Replace Outemu Switches with Kailh, Gateron, and Cherry MX?
No, Outemu switches, while a Cherry MX clone, have a distinct bottom housing design. They are exclusive to PCBs designed for Outemu switches.
Conclusion
In conclusion, the ability to replace switches on a mechanical keyboard opens up a world of customization, allowing users to fine-tune their typing experience according to their preferences. This comprehensive guide has delved into the nuances of switch pin configurations, compatibility between different switch brands, and the unique challenges posed by hot-swappable and standard PCBs.
Understanding the intricacies of mechanical switches, such as the difference between 3-pin and 5-pin designs, is crucial for a successful switch replacement. Additionally, recognizing the compatibility between popular switch brands like Cherry MX, Gateron, and Kailh ensures a seamless interchangeability that enhances user flexibility.
The advent of hot-swappable technology has brought a new level of creativity to keyboard customization, enabling users to experiment with various switch types easily. The tips provided for hot-swappable switch replacement serve as a guide for users looking to embark on this innovative journey.
For those opting for a more traditional switch replacement on standard PCBs, the guide has highlighted the intricacies of desoldering and soldering. The included video tutorial offers a visual walkthrough, making the process more accessible even for users with limited experience.
In the end, the answer to the question, “Can You Replace Switches on a Mechanical Keyboard?” is a resounding yes, with the caveat that understanding the specifics of your keyboard, switch types, and PCB design is paramount. Armed with this knowledge, users can confidently embark on the exciting journey of customizing their mechanical keyboards to suit their unique preferences and typing styles.
Kizaru is a fan, collector, and has a huge addiction to mechanical keyboards. Kizaru has a collection of dozens of mechanical keyboards that come in different sizes and use different switches. He also frequently contributes to various forums that discuss keyboards such as Reddit and GeekHack.